Security Storage
Concept
layline.io divides the management of Security tokens such as Keys, Certificates, et al, between
- Configuration Server, and
- Reactive Engine Cluster
Security tokens on each of these entities are completely separated, hence they need to be managed separately.
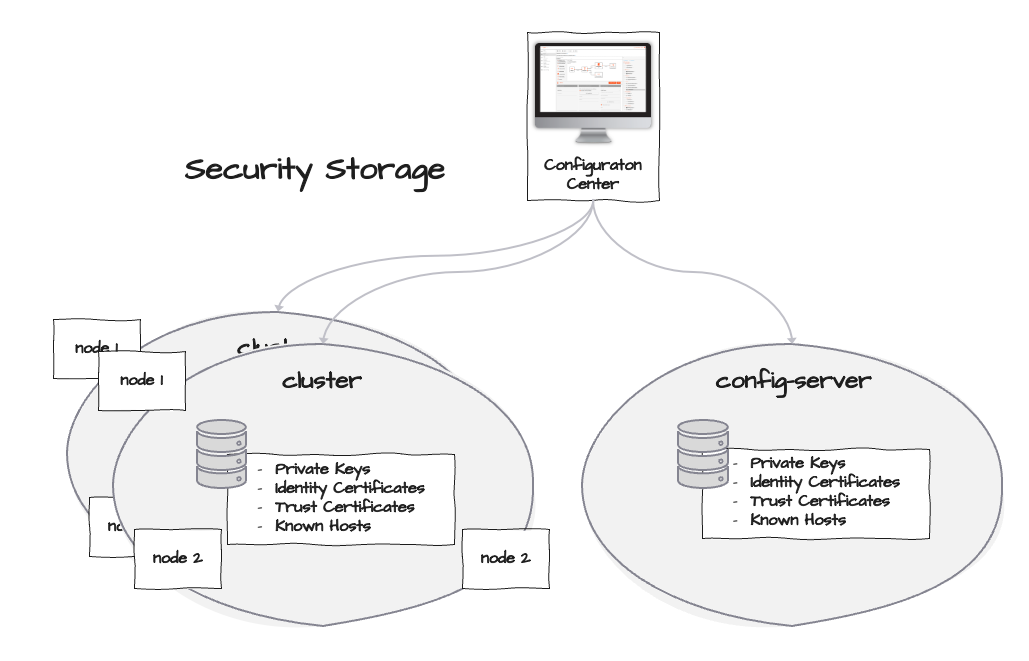
The Security Storage is the place where layline.io keeps these Security Tokens, to know how to
- encrypt and decrypt data via Secrets (3), and
- who to trust via certificates and hosts (4, 5, 6).
-
The Security Storage for the Configuration Server and the Reactive Cluster work the same, except that their configuration is found under different locations.
-
For the Security Storage of the Configuration Server go to
Settings --> Security Storage.

- For the Security Storage of a specific Reactive Cluster, go to
Operations --> <pick Cluster> --> Controllers --> Security Storage.
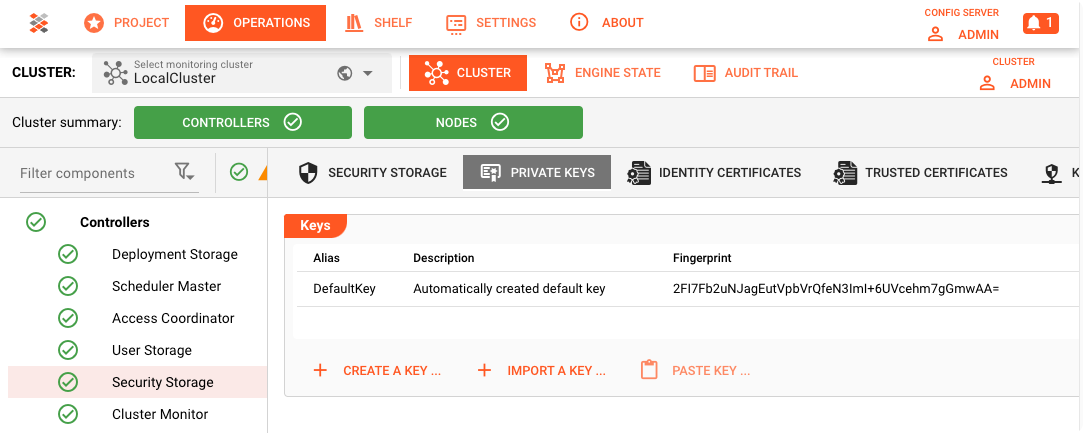
In this guide, we will explain how the Security Storage works using the example of the Configuration Server. The Security Storage of a Reactive Cluster can be configured in the same way. Differences will be marked, if any.
Private Keys and Secrets (3)

What are Secrets and why are they important?
Systems like layline.io by their nature of what they are good at (hint: interfacing ...) usually need to handle confidential information such as usernames, passwords, API-Keys etc. Let's call them Secrets Some of these Secrets can be extremely sensitive.
When working with Secrets as part of a Project, there is always the risk of them being exposed, especially in software and configuration exercises where Secrets may end up in clear text more often than not, and for lack of better mechanisms. Examples:
- In Scripts: Clear text in scripts which need to access the interfaces/subsystems.
- In Configurations: Clear text Secrets within configuration files which describe or complement a setup such as layline.io's Projects.
- On Servers: Sometimes, to avoid exposure of passwords in scripts and configurations which developers or staff are working on, Secrets are stored on Servers, but in the same clear text fashion. The upside here may be that fewer people have access to a Server. Still Secrets are exposed when stored in clear text.
- Version Control Systems: Config files checked in to a version control system end up in that vault which, again, may be accessible by a broader group of people in the organization. Thus the risk of spreading Secrets in clear text just increases.
How to best deal with Secrets in Development and Configuration environments
The only valid answer to address these challenges is that Secrets must be truly secret in the process as early-on as possible. At best, only very few trusted staff know the Secrets and have a way to make them part of the process, without exposing them.
Public/private key-pairs support a model in which Secrets can be encrypted by anyone early on, but only decrypted by the private-key holder. layline.io embraces this model to take care of Secrets and ensure that the exposure of Secrets is kept to a minimum at all times.
Concept in layline.io.
Creation of Key-Pairs
In layline.io key-pairs can be created either on the Configuration-Server or the Reactive Cluster. They can also be imported if there are existing key-pairs which should be reused.
The following image gives an overview:
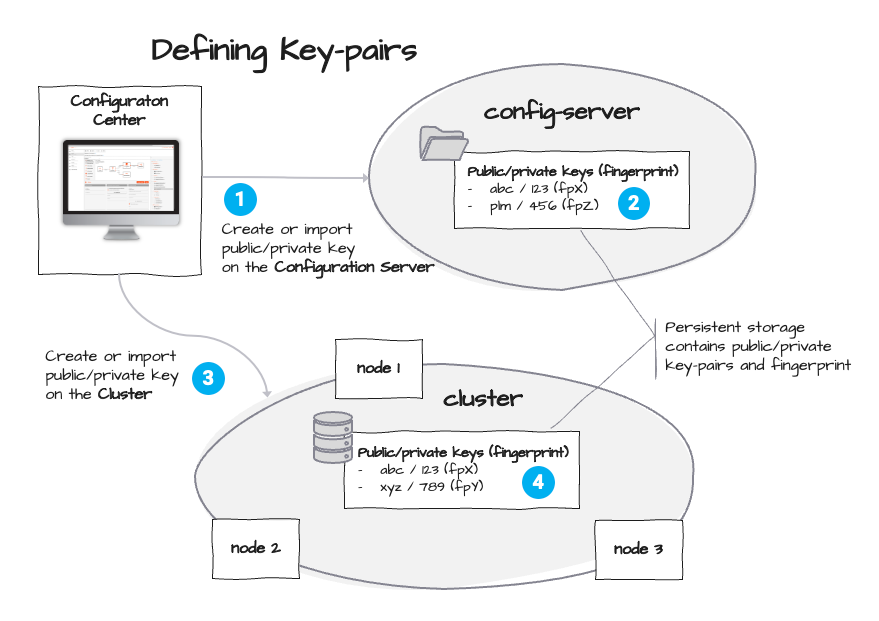
The above image depicts how Secrets are defined. As mentioned before, layline.io supports the standard public/private-key concept to secure Secrets. The key-pair can either be imported from an external source, or created from within the Configuration Center (1) and (2). Depending on where we want the key-pair to be stored, it is then either stored on the Cluster (3) or on the Reactive Engine (4). Part of the key-pair is a fingerprint which is automatically generated. In the above example two key-pairs are stored on both the Configuration Server and on the Reactive Engine. Please note, that the keys with fingerprints fpZ and fpY are exclusive to their storage, and the key with fingerprint fpX is common. This will become important as we move along with the explanation.
The advantage of creating key-pairs on the Configuration Server is that encryption is possible without a Cluster present (which may hold key-pairs as well). The encryption can be the same as on the Cluster (same key-pair) or using a different key-pair than on the target Cluster. In the latter case the encryption can be translated upon deployment, as we will learn later.
Storing keys on the Reactive Engine Cluster is a necessity if you plan to deploy Workflows to the Cluster which make use of Secrets. In that case the secret values need to be decrypted on the Cluster upon execution. This requires that it is aware of key-pairs with matching fingerprints. We will explain this in more detail below.
Creation of Key-Pairs on the Configuration Server:
To create key-pairs on the Configuration Server navigate to Settings (1) --> Security Storage (2). On the right-hand panel you will see the existing key-pairs (3).

If you haven't already defined a key-pair, a key-pair by the name of "DefaultKey" will be automatically created for you (4).
Public/private key-pairs can be created in three ways:
- Create a new key-pair (5)
- Import a key-pair from file (6)
- Paste a key-pair from the clipboard (7)
Create a key-pair (5)
To create a key select Create Key:
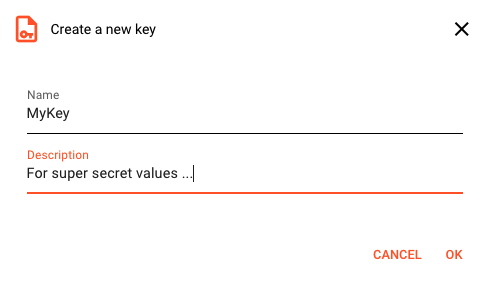
Enter a name and description. The new key will be created on the Configuration Server. The key-pair itself will not be presented back to you. A fingerprint identifying the key-pair is automatically generated. The fingerprint is later used to match encrypted values to the correct key-pair. The fingerprint itself also contains the public key.

Import a key-pair (6)
It is possible to import a key-pair which was created externally by ssh-keygen or compatible mechanisms and is in a file. Select Import a Key. A dialog will
open:
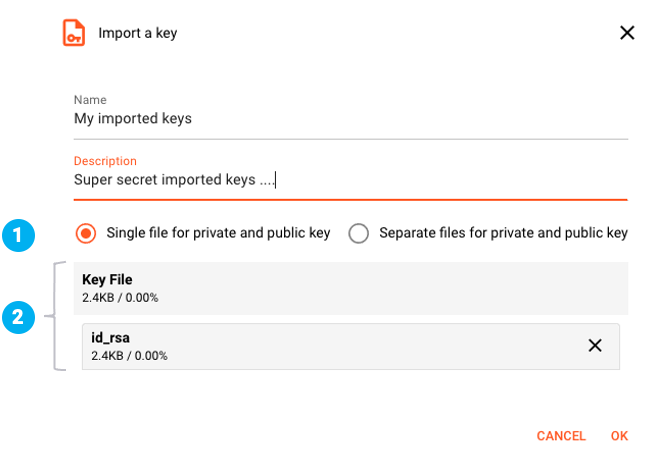
Enter a name and description for the new key-pair. Select whether your key-pair is in one file or in separate files (1). The example above uses one file which contains both public and private key
for import. You can either drag and drop the file(s) onto the respective landing-zones in the dialog (2), or select them by hitting the "+"-key in the landing-zone. Click OK to accept.
You should have a new entry in the list of keys (1):

Paste a key-pair (7)
layline.io supports to copy a key-pair. This is useful to copy a key-pair from a Configuration Server to a Reactive Engine Cluster, or vice versa. To copy click the copy button next to the key-paid.
To past click Paste Key. If a key-pair is in your clipboard (kept in layline internal format), it will be pasted and inserted.
Please note, that key-pairs added to the Configuration Server are specific to logged in user and not visible to other users that may be sharing the Configuration Server with.
Creation of Key-Pairs on the Reactive Engine Cluster
Find the correct interface under Operations (1) --> Cluster (2) --> KeyStorage (3). Make sure you have selected the correct Cluster (2) The "Controller" (4) which Cluster node is currently responsible for the Key Storage. Under "Keys" (5) you will find existing keys and can manage them.
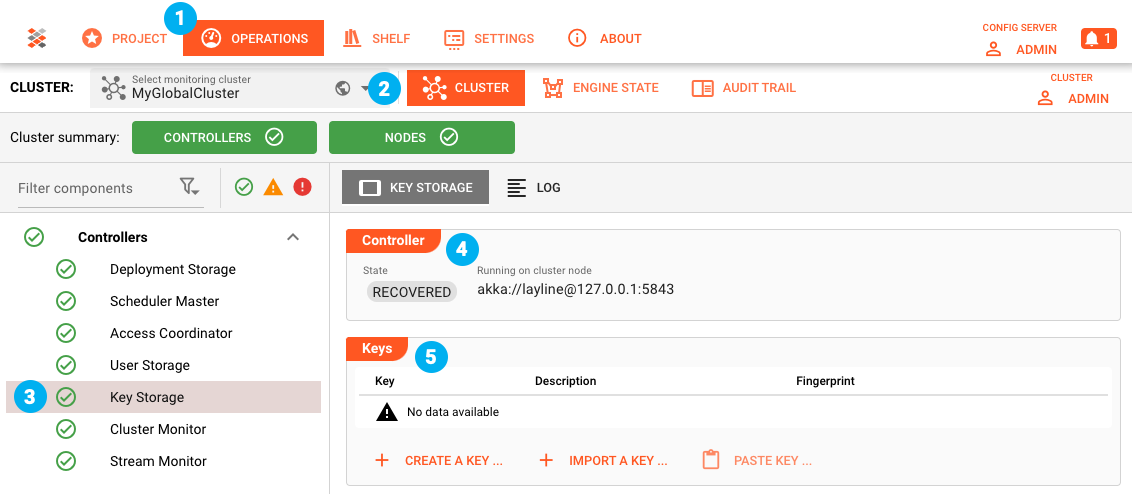
The management of the key-pairs is exactly the same as with the key-pairs in the Configuration Server, except that it all happens on a Cluster. To learn how to create or import a key please refer to here.
Creation of Secrets
Concept
In the context of configuring a Project (1), you may also configure "Secret Assets" (2) which then hold such Secrets. In the image, two Secrets Assets "A" and "B" have been defined. Each one contains a configured secret.
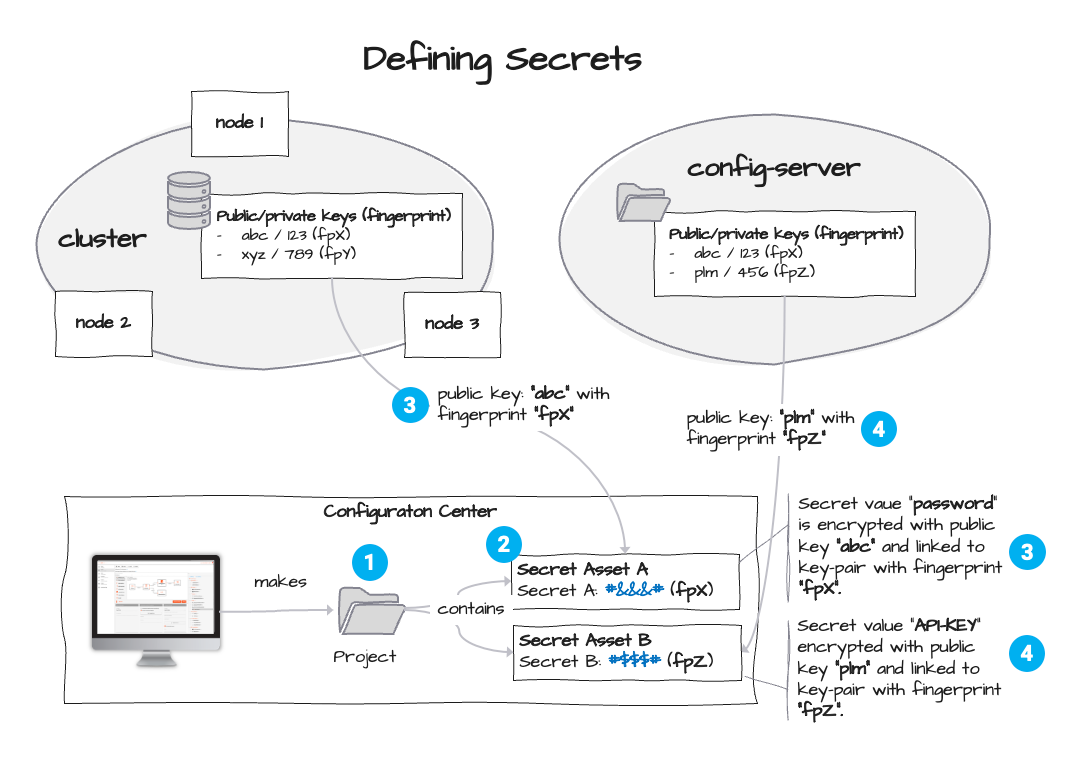
In the example we have a Secret Asset A. This Asset is references key-pair fpX from the Cluster (3). Therefore all secrets in Asset A are encrypted using this particular key-pair. Secret Asset B on the contrary references key-pair fpZ from the Configuration Server (5). All Secrets configured within this Asset are then encrypted using this key-pair fpZ.
Creating the Secret Asset
To create a Secrets Asset as part of a Project navigate to Assets, select Resources in the tree and then add a new Secret Asset (2) or (3):
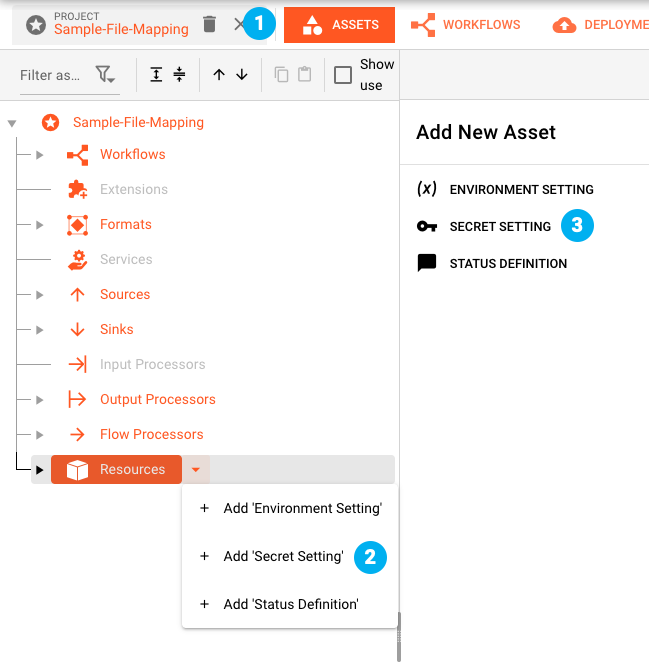
A new Secret Asset is created:
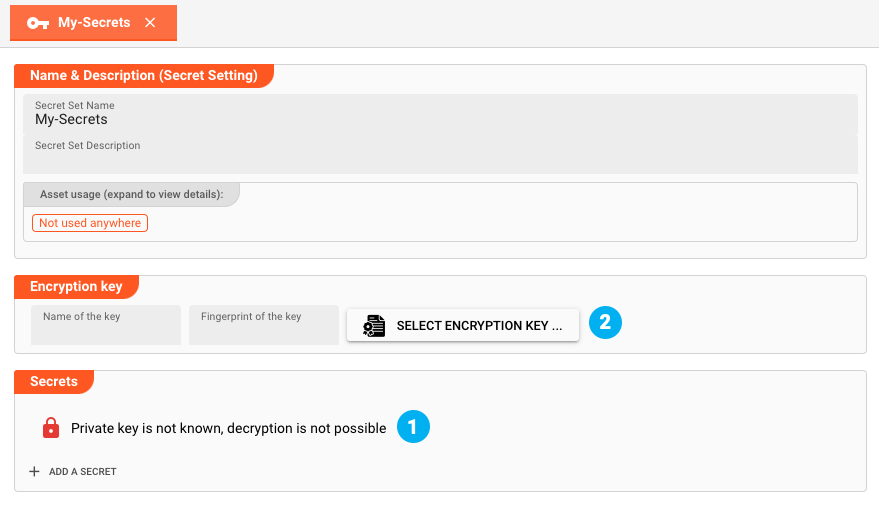
The Asset is lacking a key-pair, as can be seen in (1).
Assigning a Key-Pair
To assign a key-pair click Select Encryption Key (2). A dialog will open.

On the left side you can see all available Clusters, including the Configuration Server on top of the list (1). Selecting one of the entries in the list will show the known keys on that respective
entity (2). You can select one of these keys to be used in the Secret Asset. Click OK to confirm your choice.
The key is then added to the Secret Asset (1). We are now ready to add Secrets (2)

Click on Add a Secret to create the first Secret.

The Property name will be filled with a default (1). You can enter the value "password" (2) or whatever your secret value is. The entry will be obscured, unless you click the eye to the right of the field. In that case the entry will be clear.
Because the UI does not itself store complete key-pairs, but only the public-key part, it is important to know that once you closed and reopened the Project, you cannot view those Secrets in clear text which rely on a key-pair coming from a cluster.
In this case you can only overwrite the values. Click on the text: Value can not be decrypted. Overwrite with new value. and then overwrite the value.

How to use Secrets
Once Secrets have been defined as part of a Project, the question then is, how you can use them.
The way to use Secrets is similar to how to use Environment Variables. Let's say we have three Secrets "username", "password" and "url":

We can then use them in a JDBC Service Asset like this:

Secrets can be referenced by ?{sec:<property-name>}. This is similar to how Environment Variables are referenced, except the prefix is "sec:" instead of "lay:".
layline.io is internally using the StringSubstitutor method which provides additional functionality. You can learn more about it here under section "Using Interpolation".
Deployment of Secrets
Secrets are explicitly deployed together with Workflows etc within the "Deployment Configuration". We distinguish between deployment of Secrets which have been
- encrypted with the same key as on the target Cluster.
- encrypted with a different key as on the target Cluster.
A. Deployment of Secrets with same key-pair as Cluster
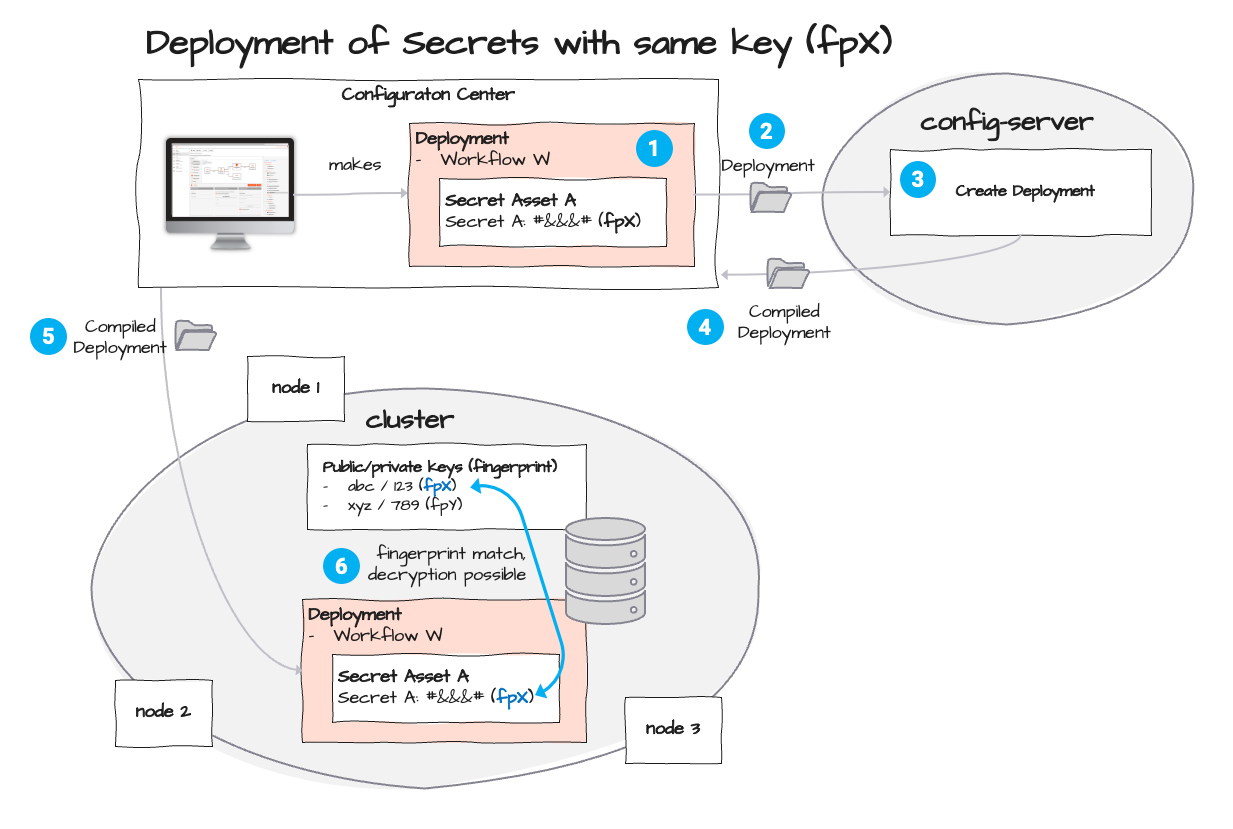
This implies, that the key-pair which is installed on the Cluster, is the same key-pair which was used when defining the Secrets in the Configuration. In this case, the Cluster is well capable of decrypting the Secrets without further input.
Let's look at an example:
We have configured a Project and in that we create a Deployment which includes a Workflow "FileMapping" together with an "My-Secrets" (1) with a fingerprint "fpX".
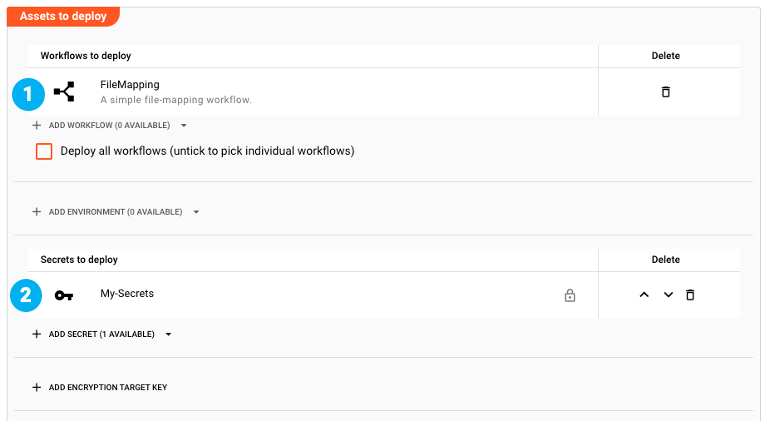
We then execute the Deployment, which means compiling it and transferring it to the Cluster.

Then this is what happens:
The Deployment (1) is sent (2) and compiled on the Configuration Server (3). The Configuration Server sends it back to the Configuration Center (4) which then forwards it to the Cluster (5). Because the Cluster is aware of the key-pair with fingerprint "fpX" the Secrets can be safely decrypted.
B. Deployment of Secrets with the same key-pair as on the Cluster
There may be Projects which contain Secrets which have been encrypted with a key-pair unknown to the target Cluster. This can happen for example if you receive a Project from someone else who is using a different key-paid, or if the keys which are used during development are simply not the same as on the Cluster (maybe for security reasons), just to name a few examples.
In this case, the Secrets need to be translated to match an existing key-pair on the Cluster.
Let's take the example from point A. above, except in this case we have a Secrets Asset using a key-pair with fingerprint "fpZ" locally (in the Project), and on the Cluster still a key-pair with fingerprint "fpX".
Obviously the fingerprints of the two key-pairs do not match. To overcome this, we can ask to translate the Secrets using a different key-pair upon deployment. To take our example, Secrets encrypted with fingerprint fpZ will be re-encrypted with the fingerprint fpX key-pair.
We can now instruct layline.io via the Deployment to translate the keys to that of the Cluster:
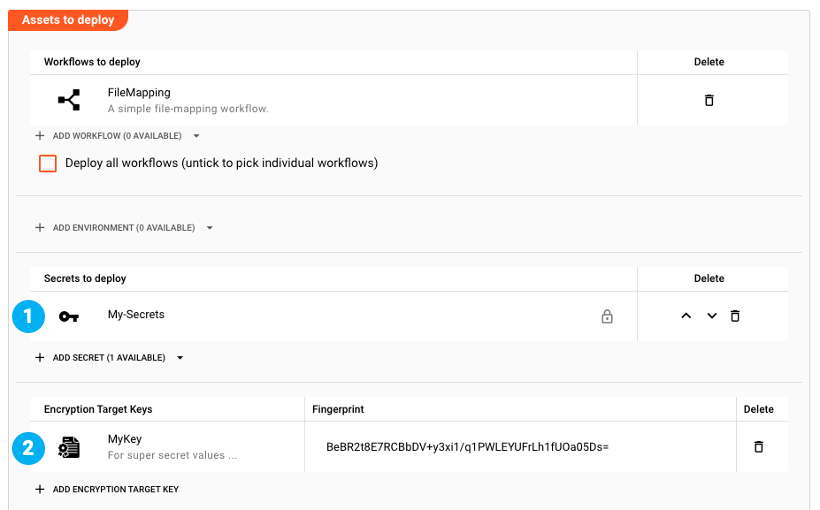
We have our Secrets to deploy in (1). We can then select "Encryption target keys" in (2). The Secrets we deploy in (1) will all be re-encrypted with all target keys selected in (2) upon deployment:
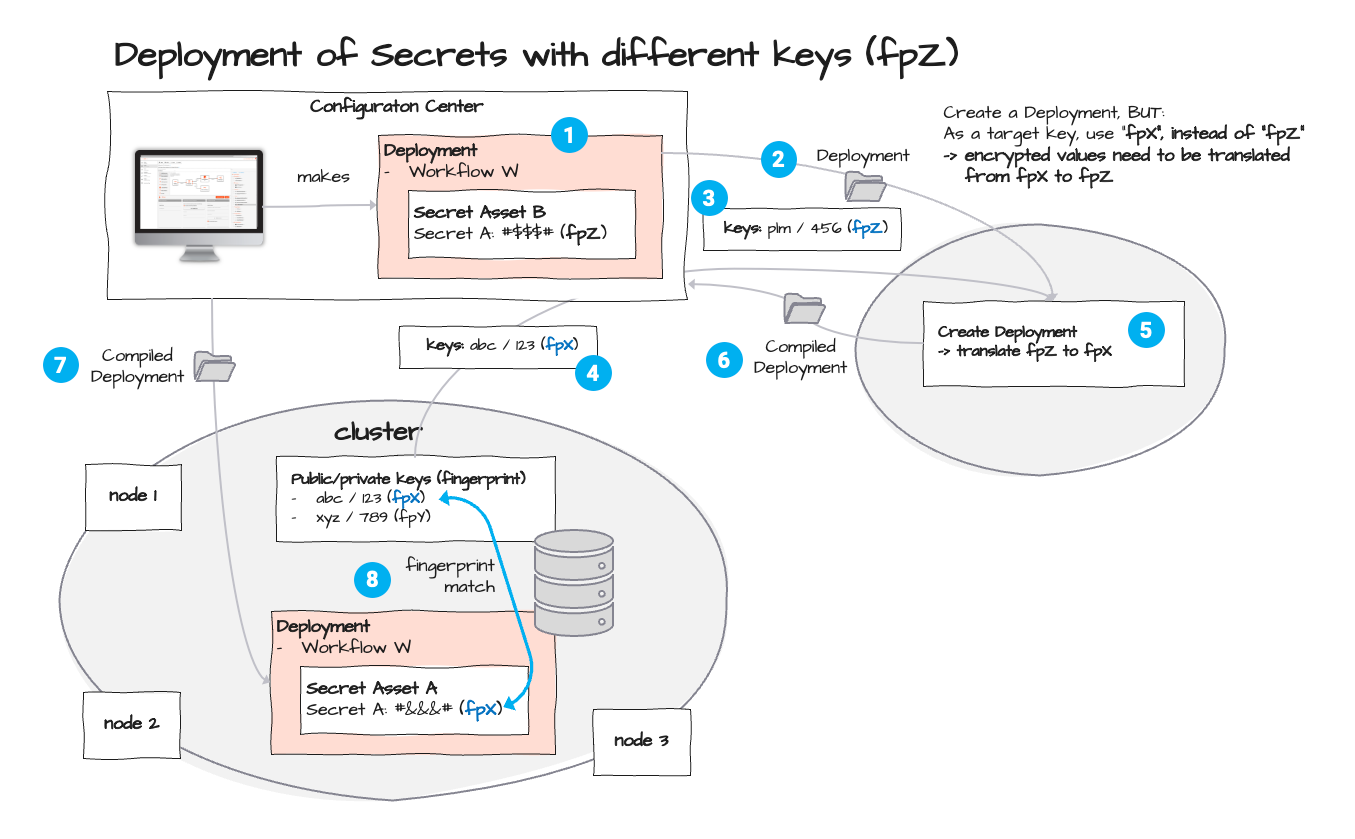
In the Deployment flow above we deploy Workflow "W" with "Secrets Asset B" (1). Please note that it is encrypted with key-pair fingerprint "fpZ". As part of the Deployment we have defined that Secrets shall be re-encrypted with key-pair fingerprint "fpX" (2). For this purpose, and in our example, the public key part of "fpX" is retrieved from the Cluster (4) and sent to the Configuration Server together with the local key-pair "fpZ". The Configuration again compiles the Deployment and - this time - it also re-encrypts all Secrets using fingerprint "fpX" **(5) **. The compiled Deployment is then sent back to the Configuration Center UI (6) which sends it to the Cluster (7). The Cluster is now again able to match the Secrets encrypted with "fpX" to the local private key "fpX" for decryption at runtime (8).
This technique is used when the key-pair on the Cluster is not accessible by anyone who is configuring a Project. Private keys therefore are never exposed in the Configuration environment. Only users with respective access privileges can retrieve or change those keys on the Cluster.
How Secrets are decrypted during execution
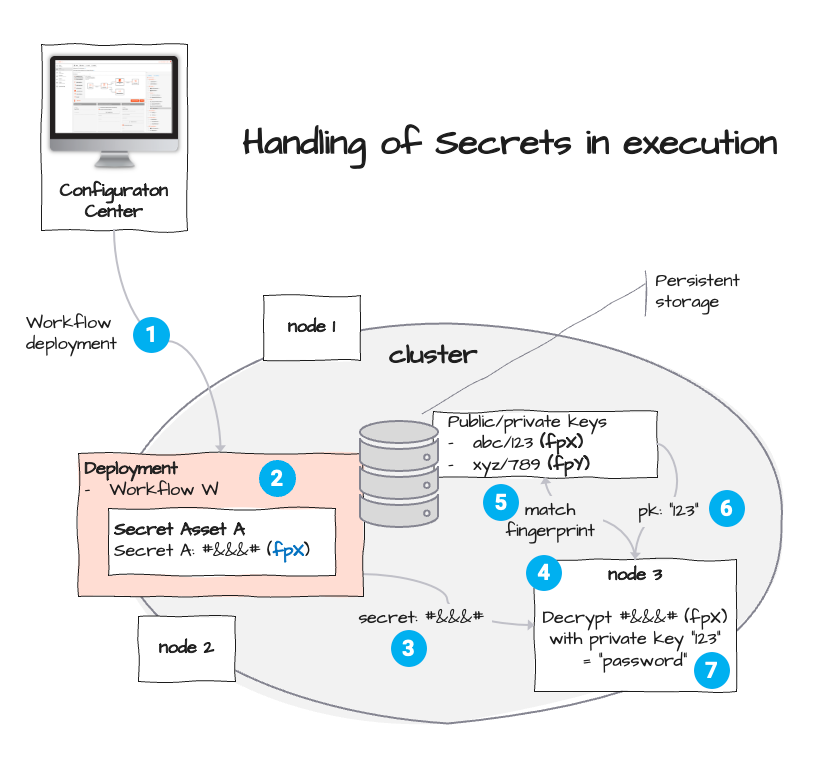
Encrypted Secrets are being sent to the Cluster as part of a Deployment (see above), which in turn contains one or more Workflows (1). Workflows may reference Secrets (2). The matching key to decrypt these Secrets is identified by the given fingerprint (fpX). In the course of Workflow execution, referenced Secrets require decryption (3). Based on the fingerprint (4) "(fpX)" the system looks up the corresponding private key "123" (5) which is used to decrypt the value "#&&&#" (6), resulting in the decrypted value "password" (7).
Summary
This concept ensures that
- No Secrets are stored in clear text as part of a Project configuration.
- No Secrets are transferred in clear text.
- Secrets do not end up stored on disks or in version control systems in clear text
- The private key to decrypt it all is only stored on the Cluster in layline.io's persistent storage.
To gain access to the private key, you need to either
- Have access to the Cluster, layline.io and its persistent storage. Even then, you would first have to find the key in the proprietary store.
- Have the right as an admin to retrieve the private key through the Configuration Center.
Identity Certificates (1)
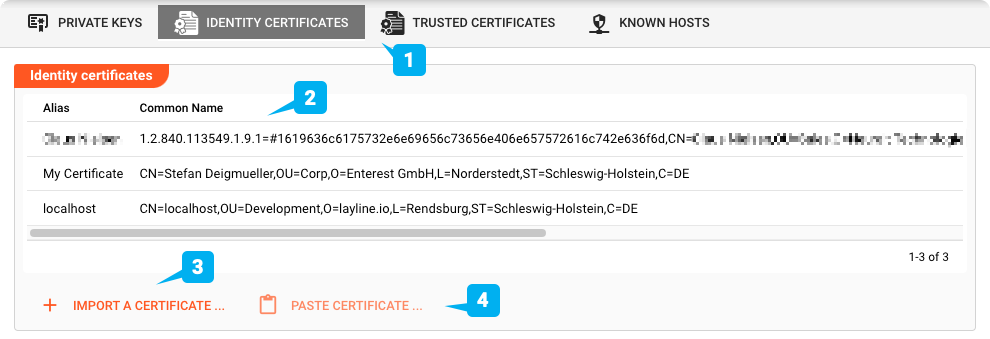
Identity Certificates are SSH public key certificates which were created by a specific Certification Authority which may, or may not be known to you. Depending on the communication counterpart, the counterpart may require you to provide the identity certificate to authorize the connection.
Importing an Identity Certificate (3)
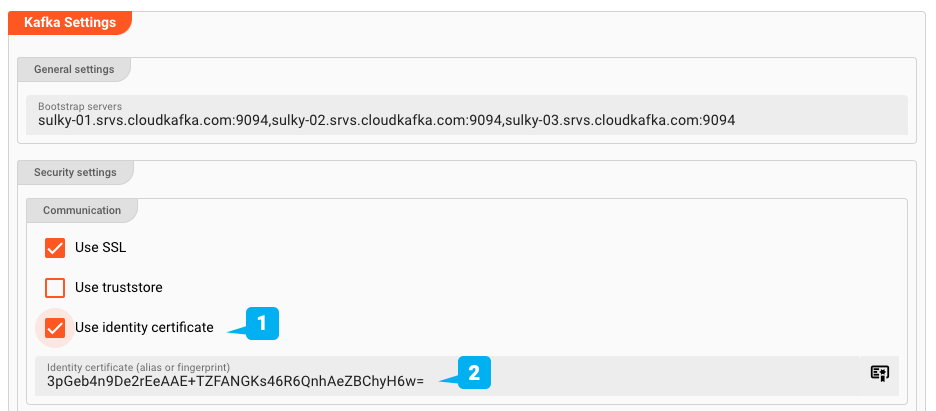
You have to import an Identity Certificate if you are using it anywhere in your Project. For example in a Kafka Connection Asset.
To use the identity, you need to first import it to layline.io. Click IMPORT A CERTFICATE .... A dialog opens:
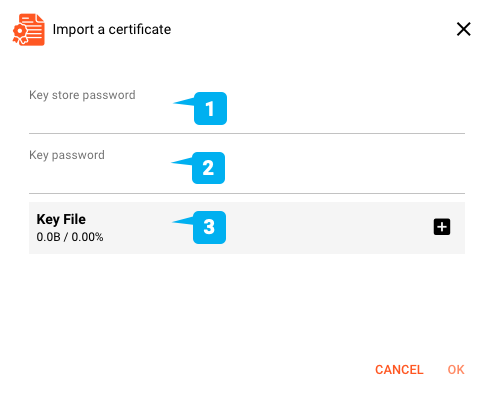
Key File(3): You can drag-and-drop a Identity Certificate file onto theKey Filepanel in the dialog. Currently supported formats are*.p12and*.jks (Java Keystore). In case your file is in a different format, you should be able to convert it using publicly available tools such as keytool. If the file contains multiple entries, the first usable entry will be used.Key store password(1): Password of the Keystore fileKey password(2): Password of the key
If you have imported an Identity Certificate onto the Configuration Server like explained above, it does not automatically transfer to a Reactive Cluster. If necessary for your setup, you will have to manually import the Identity Certificate to the respective Reactive Cluster also.
Pasting an Identity Certificate (4)
You can copy and paste an existing certificate by clicking PASTE CERTIFICATE ....
This is enabled only if a certificate is currently in the clipboard buffer and the copy was made from within the layline.io Configuration Center (the Web-Ui).
Trusted Certificates (1)

A Truststore, as the name implies, stores trusted certificates which you accept to be valid for secure connections. The underlying mechanism is identical to that found in web-browsers in which certificates for secure certificates are checked for validity. In order to accept such secure connections which require a trusted certificate, the respective certificate must be stored in the Cluster. It can also be stored in the Configuration Server to test the connection at config time.
Importing a Trusted Certificate (3)
You have to import a Trusted Certificate if you are require it when connecting to another party. For example if you enable SSL in a Kafka Connection Asset and select "Use truststore".
To import a trusted certificate click IMPORT A CERTFICATE ... (3). A dialog opens:
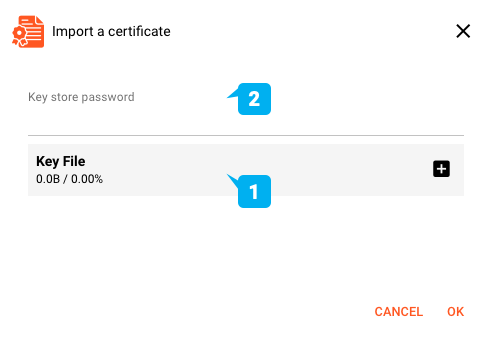
Key File(1): You can drag-and-drop a trusted Certificate file onto theKey Filepanel in the dialog. Currently only the*.jks (Java Keystore)format is supported. In case your file is in a different format, you should be able to convert it using publicly available tools such as keytool.Key store password(1): Password of the Keystore file
If you have imported a Trusted Certificate onto the Configuration Server like explained above, it does not automatically transfer to a Reactive Cluster. If necessary for your setup, you will have to manually import the Trusted Certificate to the respective Reactive Cluster also.
Pasting a Trusted Certificate (4)
You can copy and paste an existing certificate by clicking PASTE CERTIFICATE ....
This is enabled only if a certificate is currently in the clipboard buffer and the copy was made from within the layline.io Configuration Center (the Web-Ui).
Known Hosts (1)

Known Hosts entries are the equivalent to the known_hosts of SSH. It's a list of public keys for all the hosts to which layline.io can connect to via SSH. It is used for verifying the identity of other systems. Please note, that unlike SSH, the list of known hosts is not automatically extended upon successful connection. You have to maintain known hosts entries yourself.
Where do I find the correct known_hosts entry?
You should try to connect to the remote host with ssh from the command line first. If the connection is successful, you can find the corresponding entry in the known_hosts file in your ~/.ssh directory. Copy the line in question from your known_hosts file to create the corresponding entry in the next step.

Creating a Known Host (3)
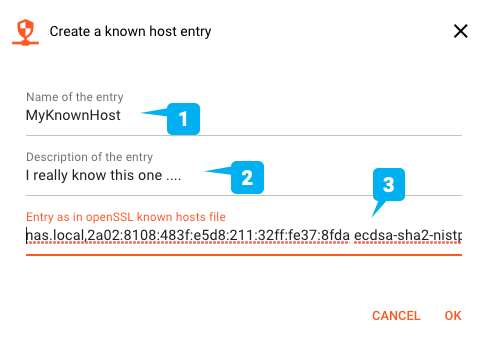
Name of the entry(1): Enter a name which identifies the entry.Description of the entry(1): Anything to help you describe this entryEntry as in openSSL known_hosts file(1): Check above to find what to enter here.
Pasting a Known Host (4)
You can copy and paste an existing Known Host entry by clicking PASTE KNOWN HOST ....
This is enabled only if a Known Host is currently in the clipboard buffer and the copy was made from within the layline.io Configuration Center (the Web-Ui).
