Multi-Node Cluster Setup
Deploy layline.io as a distributed system with separate machines for the database, configuration server, and reactive engine nodes.
Overview
By default, layline.io runs all components on a single machine with an embedded H2 database. While this works well for development and testing, production deployments require a multi-node architecture that provides:
- High availability — Multiple reactive engine nodes share the workload
- Scalability — Add nodes as processing demands increase
- Data persistence — MySQL replaces H2 for reliable cluster state storage
- Separation of concerns — Configuration, processing, and storage run on dedicated resources
This tutorial walks through setting up a complete multi-machine environment based on a minimal but production-representative architecture: one MySQL server, one configuration server, and two reactive engine nodes forming a cluster.
The two-node cluster demonstrated here scales to any number of nodes. Whether you need three nodes or thirty, the configuration pattern remains identical.
Architecture
The deployment consists of four Linux virtual machines, each with a specific role:
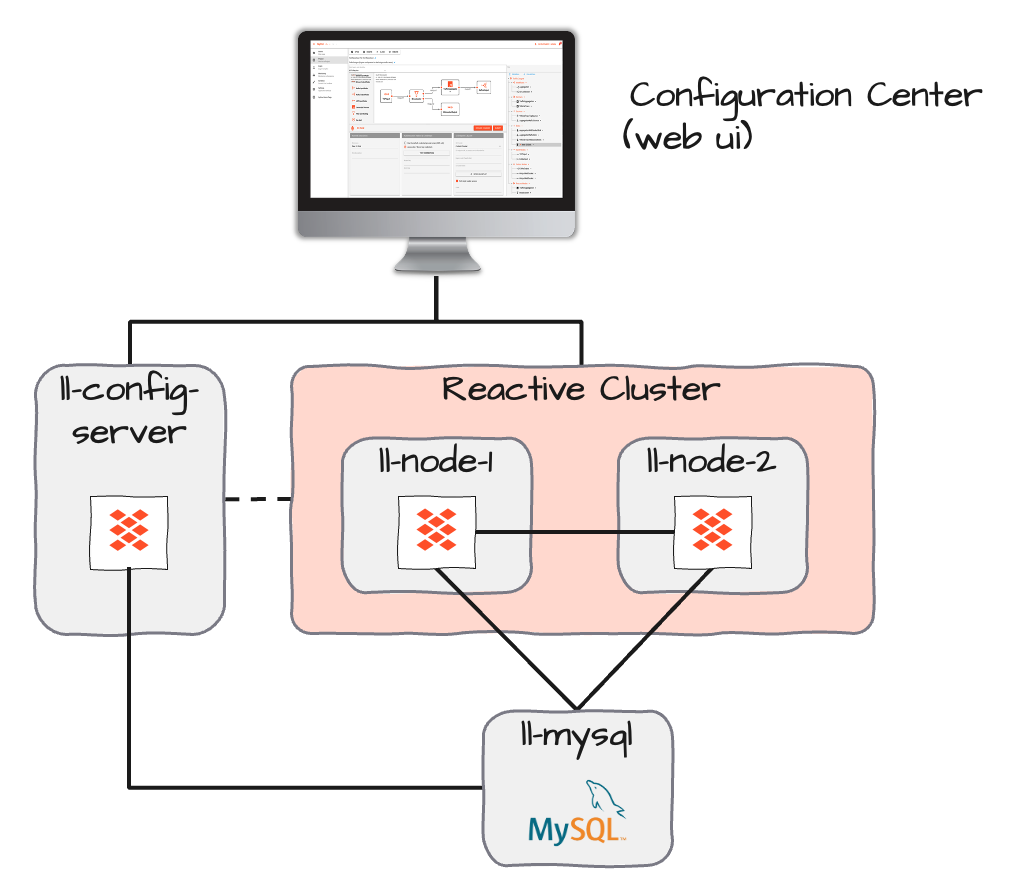
| Machine | Role | Key Ports | Purpose |
|---|---|---|---|
ll-mysql.orb.local | Database | 3306 | Stores cluster state, journal, and snapshots |
ll-config-server.orb.local | Configuration Server | 5841 | Web UI, REST API, project management |
ll-node-1.orb.local | Reactive Engine | 5842 (REST), 5843 (Cluster) | Processing node 1 |
ll-node-2.orb.local | Reactive Engine | 5842 (REST), 5843 (Cluster) | Processing node 2 |
Network Flow:
- Configuration Server connects to MySQL for persistence
- Web browsers connect to Configuration Server (port 5841)
- Reactive nodes connect to MySQL for journal/snapshot storage
- Reactive nodes discover each other via cluster port (5843)
- Configuration Server communicates with reactive cluster nodes
All machines must have bidirectional network access on the ports listed above. Firewalls must allow these connections before starting services.
Prerequisites
Before starting, ensure you have:
| Requirement | Details |
|---|---|
| 4 Linux VMs | Any distribution supporting Java 17+ (Ubuntu, RHEL, Debian, etc.) |
| Network connectivity | All VMs can reach each other on required ports |
| layline.io distribution | Downloaded for Linux (AMD64 or ARM as appropriate) |
| Root/sudo access | For installing MySQL and layline.io services |
| Hostnames configured | Each VM has a resolvable hostname (DNS or /etc/hosts) |
This guide covers production multi-node deployment. For single-machine development setup, see:
- Install Locally — Full local installation for development
- Install with Docker — Quick evaluation via Docker
Hostname Configuration
Each machine must be addressable by its canonical hostname. Add entries to /etc/hosts on all machines if DNS is not available:
192.168.1.10  ll-mysql.orb.local
192.168.1.11  ll-config-server.orb.local
192.168.1.12  ll-node-1.orb.local
192.168.1.13  ll-node-2.orb.local
Step 1: MySQL Database Setup
The reactive cluster requires a multi-user database for state persistence. H2 and SQLite are single-user databases and cannot support clustered operation.
1.1 Install MySQL
Install MySQL on the dedicated database machine:
sudo apt update
sudo apt install mysql-server
sudo systemctl enable mysql
sudo systemctl start mysql
sudo dnf install mysql-server
sudo systemctl enable mysqld
sudo systemctl start mysqld
1.2 Create Database and User
Connect to MySQL as and create the layline database:
sudo mysql -u root
-- Create database
CREATE DATABASE layline CHARACTER SET utf8mb4 COLLATE utf8mb4_unicode_ci;

-- Create user (adjust password as needed)
CREATE USER 'layline'@'%' IDENTIFIED BY 'your_secure_password';
GRANT ALL PRIVILEGES ON layline.* TO 'layline'@'%';
FLUSH PRIVILEGES;
The '%' wildcard allows connections from any host. For production, restrict this to specific IP ranges:
CREATE USER 'layline'@'192.168.1.%' IDENTIFIED BY 'your_secure_password';
1.3 Create Required Tables
layline.io provides SQL scripts to create the required tables. These are located in the scripts/ directory of your layline.io installation:
# On the config server machine (after layline.io is installed)
cd /opt/layline/scripts/sql/mysql
ls -la
You should see one SQL file:
persistence-schema.sql— Contains DDL statements for three tables
Apply these scripts to your database:
mysql -u layline -p -h ll-mysql.orb.local layline < persistence-schema.sql
1.4 Verify Tables
Connect to MySQL and confirm the tables exist:
mysql -u layline -p -h ll-mysql.orb.local layline
SHOW TABLES;
You should see:
+--------------------+
| Tables_in_layline  |
+--------------------+
| journal            |
| snapshot           |
| read_journal       |
+--------------------+
1.5 Configure MySQL Network Access
Ensure MySQL listens on all interfaces (or specific IPs) and accepts remote connections:
Edit /etc/mysql/mysql.conf.d/mysqld.cnf (Ubuntu/Debian) or /etc/my.cnf (RHEL):
[mysqld]
bind-address = 0.0.0.0
# Or for specific interface:
# bind-address = 192.168.1.10
Restart MySQL:
sudo systemctl restart mysql
Verify connectivity from the other machines:
# From config server or reactive nodes
mysql -u layline -p -h ll-mysql.orb.local -e "SELECT 1"
Step 2: Configuration Server Setup
The configuration server provides the web UI and manages project definitions. It requires MySQL for persistence.
2.1 Install layline.io
On the configuration server machine:
# Download (adjust version as needed)
curl -O https://download.layline.io/releases/layline-linux-amd64-2.5.4.sh

# Run installer
chmod +x layline-linux-amd64-2.5.4.sh
sudo ./layline-linux-amd64-2.5.4.sh
Follow the installation prompts. The default installation location is /opt/layline/.
2.2 Configure application.conf
Edit the configuration server settings:
sudo vi /opt/layline/config/config-server/application.conf
Replace the contents with the following configuration, adjusting values for your environment:
layline {
   config-server {
    rest-server {
      canonical {
        hostname = "ll-config-server.orb.local"
      }
      bind {
         port = 5841
         hostname = 0.0.0.0
      }
    }

    # logging {
    #   short-logger-names = true
    #   show-status-codes = false
    # }
  }
}

pekko {

  persistence {
    journal {
      plugin = "jdbc-journal"
    }
    snapshot-store {
      plugin = "jdbc-snapshot-store"
    }
  }

}

pekko-persistence-jdbc {
  shared-databases {
    h2file {
      profile = "slick.jdbc.H2Profile$"
      db {
        url = "jdbc:h2:file:/root/.layline/config-server/database/h2/journal;DATABASE_TO_UPPER=false;INIT=runscript from '/mnt/machines/ll-config-server/opt/layline/scripts/sql/h2/persistence-schema.sql';"
        user = "root"
        password = "root"
        driver = "org.h2.Driver"
        numThreads = 5
        maxConnections = 5
        minConnections = 1
      }
    }
    mysql {
      profile = "slick.jdbc.MySQLProfile$"
      db {
        host = "ll-mysql.orb.local"
        port = "3306"
        url = "jdbc:mysql://ll-mysql.orb.local:3306/layline?cachePrepStmts=true&cacheCallableStmts=true&cacheServerConfiguration=true&useLocalSessionState=true&elideSetAutoCommits=true&alwaysSendSetIsolatio
n=false&enableQueryTimeouts=false&connectionAttributes=none&verifyServerCertificate=false&useSSL=false&allowPublicKeyRetrieval=true&useUnicode=true&useLegacyDatetimeCode=false&serverTimezone=UTC&rewriteBatc
hedStatements=true"
        user = "layline"
        password = "your_secure_password"
        driver = "com.mysql.cj.jdbc.Driver"
        numThreads = 5
        maxConnections = 5
        minConnections = 1
      }
    }
  }
}
The example uses useSSL=false for clarity. In production, configure MySQL with SSL certificates and enable useSSL=true with appropriate truststore settings.
2.3 Start the Configuration Server
sudo /opt/layline/bin/config-server
Expected output:
[LAY-00050] ###################################################################
[LAY-00050] #  Layline Config Server 2.5.4                                    #
[LAY-00050] ###################################################################
...
[INFO] Layline Configuration Server up and running
The server is ready when you see the "up and running" message. Keep this terminal open or configure the service to run under systemd (see Production Notes).
2.4 Verify Web Access
Open a browser and navigate to:
http://ll-config-server.orb.local:5841
You should see the login page. Default credentials are admin / admin.
Step 3: Reactive Engine Node Configuration
Each reactive engine node requires identical configuration except for the canonical hostname.
3.1 Install layline.io on Both Nodes
On both ll-node-1 and ll-node-2:
# Download and install (same as config server)
curl -O https://download.layline.io/releases/layline-linux-amd64-2.5.4.sh
chmod +x layline-linux-amd64-2.5.4.sh
sudo ./layline-linux-amd64-2.5.4.sh
3.2 Configure Node 1
On ll-node-1.orb.local, edit the reactive engine configuration:
sudo vi ~/.layline/reactive-engine/config/application.conf
layline {
  reactive-engine {
    rest-server {
      canonical {
        hostname = "ll-node-1.orb.local"
      }
      bind {
         port = 5842
         hostname = 0.0.0.0
      }
    }

    # logging {
    #   short-logger-names = true
    #   show-status-codes = false
    # }
  }
}

pekko {

  actor {
    provider = cluster
  }

#  discovery {
#    method = akka-dns
#  }

  management {
    http {
      bind-port = 8558
    }
  }

  remote {
    log-remote-lifecycle-events = off
    artery {
      enabled = on
      transport = tcp
      canonical.hostname="ll-node-1.orb.local"
      canonical.port = 5843
      bind.hostname = "0.0.0.0"
      bind.port = 5843
    }
  }

  cluster {
    min-nr-of-members = 2 # Minimum expected number of cluster members
    seed-nodes = [
      "pekko://[email protected]:5843" # 1st node
      "pekko://[email protected]:5843" # 2nd node
    ]

    split-brain-resolver {
      active-strategy = keep-majority
    }
  }

  persistence {
    journal {
      plugin = "jdbc-journal"
    }
    snapshot-store {
      plugin = "jdbc-snapshot-store"
    }
  }

}

pekko-persistence-jdbc {
  shared-databases {
    h2file {
      profile = "slick.jdbc.H2Profile$"
      db {
        url = "jdbc:h2:file:/root/.layline/reactive-engine/database/h2/journal;DATABASE_TO_UPPER=false;INIT=runscript from '/mnt/machines/ll-node-1/opt/layline/scripts/sql/h2/persistence-schema.sql';"
        user = "root"
        password = "root"
        driver = "org.h2.Driver"
        numThreads = 5
        maxConnections = 5
        minConnections = 1
      }
    }
    mysql {
      profile = "slick.jdbc.MySQLProfile$"
      db {
        host = "ll-mysql.orb.local"
        port = "3306"
        url = "jdbc:mysql://ll-mysql.orb.local:3306/layline?cachePrepStmts=true&cacheCallableStmts=true&cacheServerConfiguration=true&useLocalSessionState=true&elideSetAutoCommits=true&alwaysSendSetIsolatio
n=false&enableQueryTimeouts=false&connectionAttributes=none&verifyServerCertificate=false&useSSL=false&allowPublicKeyRetrieval=true&useUnicode=true&useLegacyDatetimeCode=false&serverTimezone=UTC&rewriteBatc
hedStatements=true"
        user = "laylien"
        password = "your_secure_password"
        driver = "com.mysql.cj.jdbc.Driver"
        numThreads = 5
        maxConnections = 5
        minConnections = 1
      }
    }
  }
}

jdbc-journal {
  use-shared-db = "mysql"
}

jdbc-read-journal {
  use-shared-db = "mysql"
}

jdbc-snapshot-store {
  use-shared-db = "mysql"
}
3.3 Configure Node 2
On ll-node-2.orb.local, create an identical configuration except change the canonical hostname:
layline {
  reactive-engine {
    rest-server {
      canonical {
        hostname = "ll-node-2.orb.local"
      }
      bind {
         port = 5842
         hostname = 0.0.0.0
      }
    }

    # logging {
    #   short-logger-names = true
    #   show-status-codes = false
    # }
  }
}

pekko {

  actor {
    provider = cluster
  }

#  discovery {
#    method = akka-dns
#  }

  management {
    http {
      bind-port = 8558
    }
  }

  remote {
    log-remote-lifecycle-events = off
    artery {
      enabled = on
      transport = tcp
      canonical.hostname="ll-node-2.orb.local"
      canonical.port = 5843
      bind.hostname = "0.0.0.0"
      bind.port = 5843
    }
  }

  cluster {
    min-nr-of-members = 2 # Minimum expected number of cluster members
    seed-nodes = [
      "pekko://[email protected]:5843" # 1st node
      "pekko://[email protected]:5843" # 2nd node
    ]

    split-brain-resolver {
      active-strategy = keep-majority
    }
  }

  persistence {
    journal {
      plugin = "jdbc-journal"
    }
    snapshot-store {
      plugin = "jdbc-snapshot-store"
    }
  }

}

pekko-persistence-jdbc {
  shared-databases {
    h2file {
      profile = "slick.jdbc.H2Profile$"
      db {
        url = "jdbc:h2:file:/root/.layline/reactive-engine/database/h2/journal;DATABASE_TO_UPPER=false;INIT=runscript from '/mnt/machines/ll-node-2/opt/layline/scripts/sql/h2/persistence-schema.sql';"
        user = "root"
        password = "root"
        driver = "org.h2.Driver"
        numThreads = 5
        maxConnections = 5
        minConnections = 1
      }
    }
    mysql {
      profile = "slick.jdbc.MySQLProfile$"
      db {
        host = "ll-mysql.orb.local"
        port = "3306"
        url = "jdbc:mysql://ll-mysql.orb.local:3306/layline?cachePrepStmts=true&cacheCallableStmts=true&cacheServerConfiguration=true&useLocalSessionState=true&elideSetAutoCommits=true&alwaysSendSetIsolatio
n=false&enableQueryTimeouts=false&connectionAttributes=none&verifyServerCertificate=false&useSSL=false&allowPublicKeyRetrieval=true&useUnicode=true&useLegacyDatetimeCode=false&serverTimezone=UTC&rewriteBatc
hedStatements=true"
        user = "layline"
        password = "your_secure_password"
        driver = "com.mysql.cj.jdbc.Driver"
        numThreads = 5
        maxConnections = 5
        minConnections = 1
      }
    }
  }
}

jdbc-journal {
  use-shared-db = "mysql"
}

jdbc-read-journal {
  use-shared-db = "mysql"
}

jdbc-snapshot-store {
  use-shared-db = "mysql"
}
Both nodes must have identical seed-nodes lists. The order matters — nodes try to join seed nodes in sequence until successful.
3.4 Start the Reactive Engines
On Node 1:
reactive-engine
You'll see log messages indicating the node is waiting for the cluster to form:
[INFO] trying to connect to the cluster
On Node 2:
reactive-engine
Once Node 2 starts, both nodes should discover each other and form the cluster: Both nodes should now show:
26-04-30 15:56:23.561 INFO  Layline - [LAY-11000] trying to connect to the cluster
26-04-30 15:56:24.374 INFO  Layline - [LAY-11001] cluster successfully joined, member status is up
Step 4: Web UI Configuration
With the services running, configure the cluster in the Configuration Center.
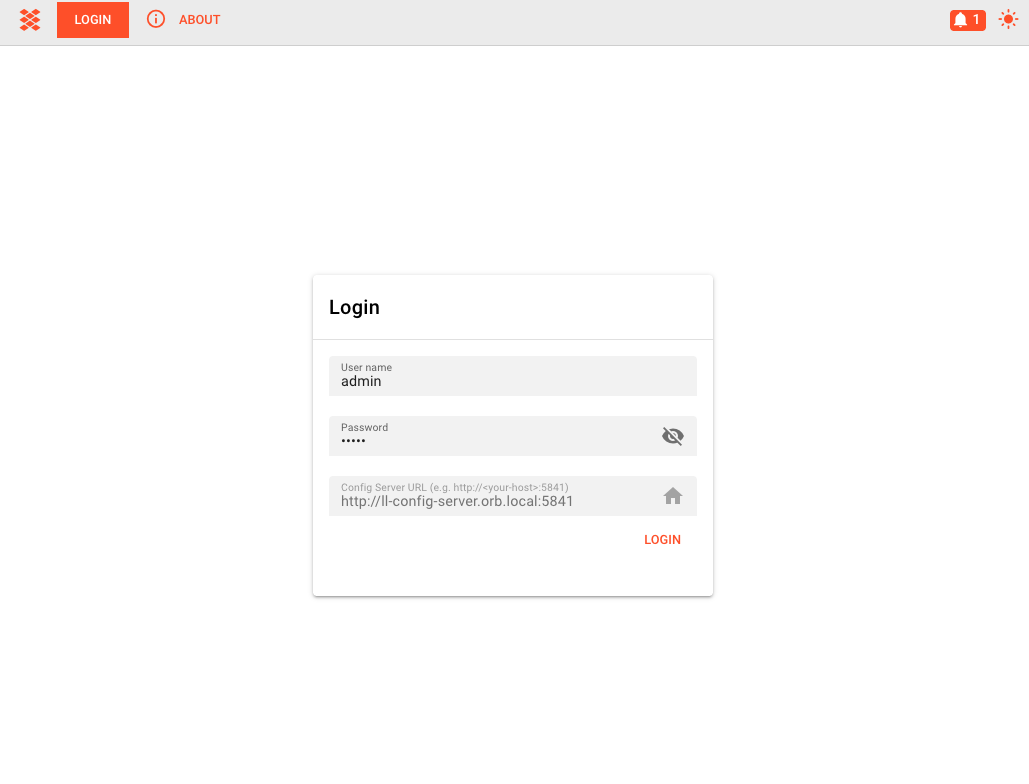
4.1 Access Configuration Center
Open the browser and navigate to:
http://ll-config-server.orb.local:5841
Login with admin / admin.
4.2 Create Cluster Settings
-
Go to Settings → Cluster Storage → Clusters
-
Click the + button to add a new cluster
-
Enter the cluster details:
| Field | Value | Description |
|---|---|---|
| Name | Production | Display name for this cluster |
| Bootstrap Nodes | ll-node-1.orb.local:5842 | First reactive engine address |
ll-node-2.orb.local:5842 | Second reactive engine address |
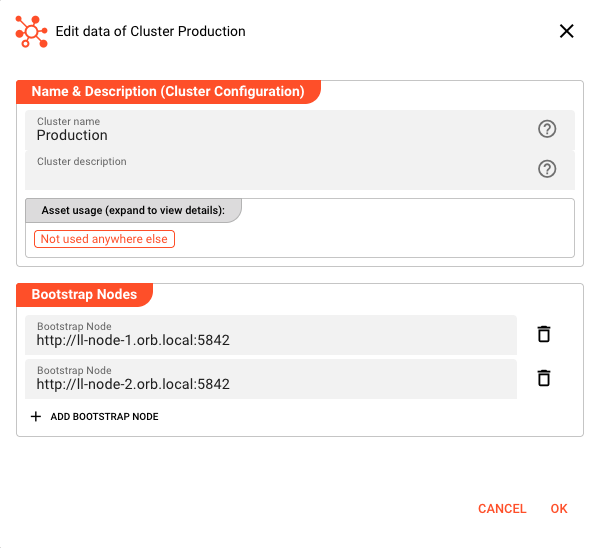
- Click Save
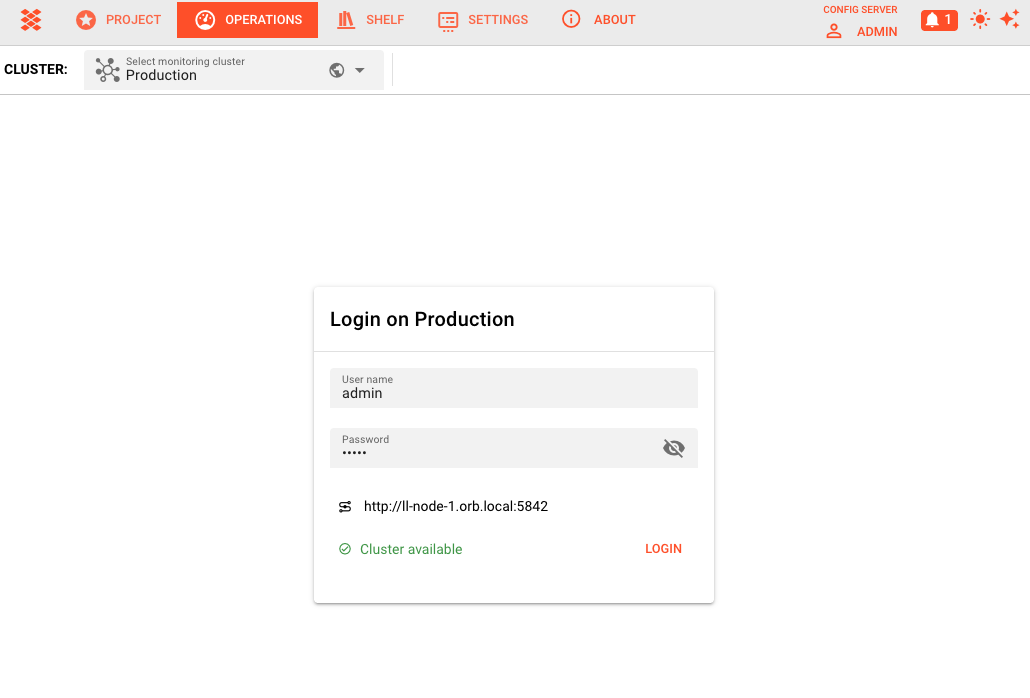
4.3 Connect to the Cluster
- Navigate to Operations in the left menu
- Select your cluster from the dropdown at the top
- Click Login when prompted
- Enter credentials:
admin/admin
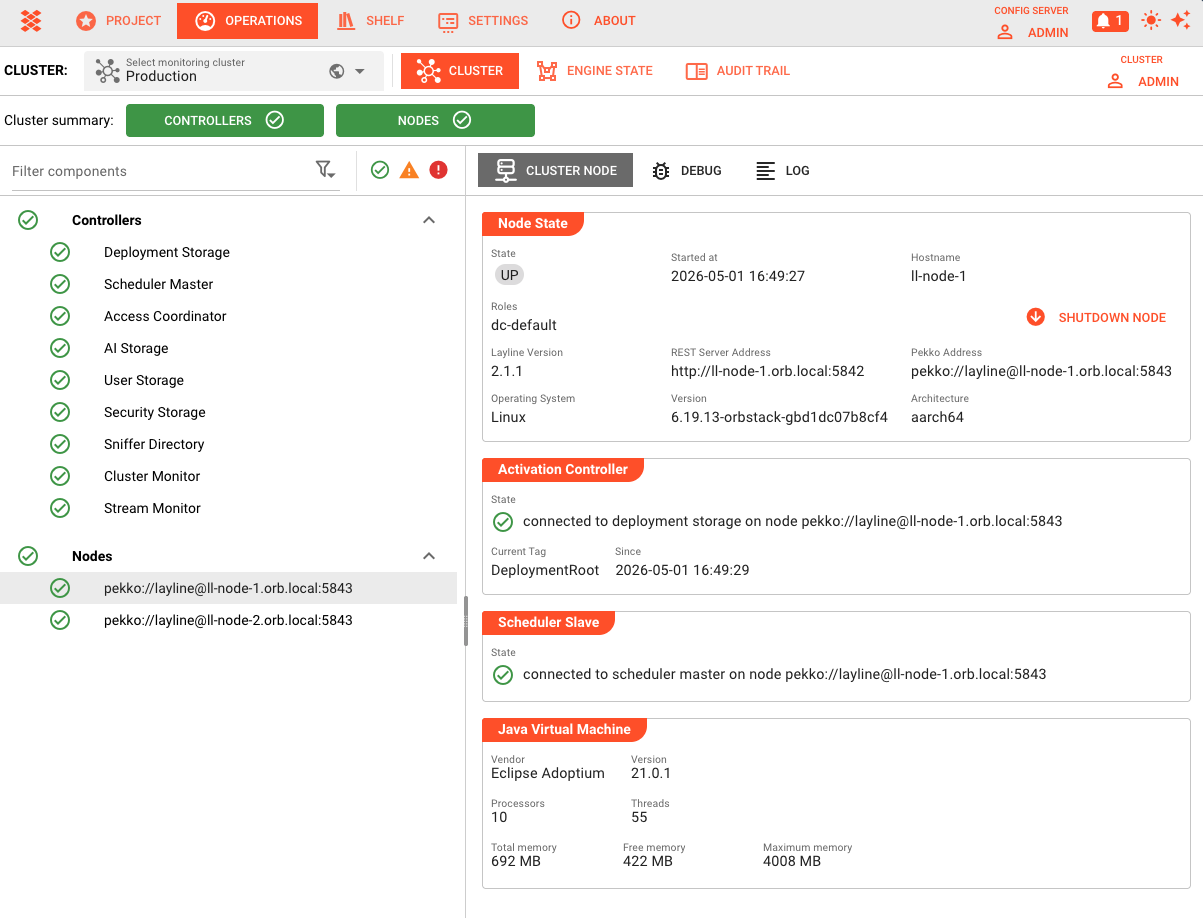
4.4 Verify Node Status
After logging in, the Cluster page displays both nodes:
| Column | Description |
|---|---|
| Name | Node hostname |
| State | Should show Up in green |
| Version | layline.io version running on the node |
| Uptime | How long the node has been running |
Click on a node to view detailed information:
- JVM memory usage
- Architecture and OS details
- Thread and connection counts
Verification
Confirm the setup is working correctly:
5.1 Check Cluster Formation
On either reactive node, check the cluster status via logs:
grep "cluster successfully joined" ~/.layline/reactive-engine/log/reactive-engine.log
Expected output:
24-12-20 14:01:08.427 INFO Layline - [LAY-11001] cluster successfully joined, member status is up
5.2 Test Database Connectivity
Verify both nodes are writing to MySQL:
-- In MySQL, check for recent journal entries
SELECT COUNT(*) FROM layline.event_journal WHERE persistence_id LIKE '% reactive-engine%';
The count should increase as operations occur.
5.3 Web UI Connectivity
In the Configuration Center:
- Operations → Cluster should show 2 nodes
- Both nodes should have green "Up" status
- Node details should display correct IP addresses and versions
Scaling: Adding More Nodes
To add a third node (or more), follow this pattern:
6.1 Provision New Machine
- Install layline.io
- Configure hostname (e.g.,
ll-node-3.orb.local) - Ensure network connectivity to MySQL and existing nodes
6.2 Update Configuration
On all nodes, update the seed-nodes list:
pekko {
  cluster {
    seed-nodes = [
      "pekko://[email protected]:5843",
      "pekko://[email protected]:5843",
      "pekko://[email protected]:5843"  # Added
    ]
  }
}
After changing seed-nodes, restart reactive engines one at a time to avoid cluster disruption.
6.3 Update Web UI
In Configuration Center:
- Settings → Cluster Storage → Clusters
- Edit your cluster
- Add
ll-node-3.orb.local:5842to Bootstrap Nodes - Save
The new node will appear in Operations → Cluster once it joins.
Production Notes
Systemd Service Configuration
For production, run layline.io as systemd services instead of interactive processes.
Configuration Server (/etc/systemd/system/layline-config-server.service):
[Unit]
Description=Layline Configuration Server
After=network.target mysql.service

[Service]
Type=simple
User=layline
Group=layline
ExecStart=/root/.layline/bin/config-server
Restart=always
RestartSec=10

[Install]
WantedBy=multi-user.target
Reactive Engine (/etc/systemd/system/layline-reactive-engine.service):
[Unit]
Description=Layline Reactive Engine
After=network.target mysql.service

[Service]
Type=simple
User=layline
Group=layline
ExecStart=/root/layline/bin/reactive-engine
Restart=always
RestartSec=10

[Install]
WantedBy=multi-user.target
Enable and start:
sudo systemctl daemon-reload
sudo systemctl enable layline-config-server
sudo systemctl enable layline-reactive-engine
sudo systemctl start layline-config-server
sudo systemctl start layline-reactive-engine
Firewall Configuration
Open required ports on each machine:
| Machine | Incoming Ports | Source |
|---|---|---|
| MySQL | 3306 | Config Server, Reactive Nodes |
| Config Server | 5841 | Web browsers, Reactive Nodes |
| Reactive Nodes | 5842 | Config Server, External clients |
| Reactive Nodes | 5843 | Other Reactive Nodes |
Example ufw rules (Ubuntu):
# On MySQL server
sudo ufw allow from 192.168.1.0/24 to any port 3306

# On Config Server
sudo ufw allow 5841/tcp

# On Reactive Nodes
sudo ufw allow 5842/tcp
sudo ufw allow from 192.168.1.0/24 to any port 5843
SSL/TLS for MySQL
For production, enable SSL for MySQL connections:
- Generate or obtain SSL certificates for MySQL
- Configure MySQL with certificate paths in
my.cnf:[mysqld]ssl-ca=/etc/mysql/ssl/ca.pemssl-cert=/etc/mysql/ssl/server-cert.pemssl-key=/etc/mysql/ssl/server-key.pemrequire_secure_transport=ON - Update
application.confon all nodes:url = "jdbc:mysql://ll-mysql.orb.local:3306/layline?useSSL=true&serverTimezone=UTC"
Backup Strategy
MySQL Backups:
# Daily backup script
mysqldump -u layline -p your_secure_password > layline-backup-$(date +%Y%m%d).sql
Configuration Backups:
Projects are stored in MySQL, so database backups include all configuration. For additional safety, export projects periodically via the Configuration Center or REST API.
Monitoring
Enable Prometheus metrics export for cluster monitoring:
# In reactive-engine application.conf
layline {
  reactive-engine {
    metrics {
      enabled = true
      port = 9095
    }
  }
}
See Gathering Statistics through Metrics for details.
Troubleshooting
Nodes Cannot Form Cluster
Symptom: Nodes start but never form a cluster, logs show "Waiting for minimum members"
Check:
- Network connectivity between nodes on port 5843:
telnet ll-node-1.orb.local 5843
- Hostname resolution works from both nodes:
ping ll-node-1.orb.localping ll-node-2.orb.local
- Seed node addresses match the canonical hostnames in configuration
- Firewalls allow traffic on cluster port (5843)
Cannot Connect to MySQL
Symptom: Services fail to start with JDBC connection errors
Check:
- MySQL is running and accessible:
mysql -u layline -p -h ll-mysql.orb.local -e "SELECT 1"
- Database and tables exist (run script in
/opt/layline/scripts/mysql/) - MySQL user has correct permissions and host wildcard
bind-addressin MySQL config allows remote connections
Configuration Center Cannot Reach Cluster
Symptom: Operations page shows cluster as unreachable
Check:
- Cluster settings in Settings → Cluster Storage have correct bootstrap node addresses
- Reactive engines are running and cluster is formed
- Network path exists from config server to reactive nodes on port 5842
- Check reactive engine logs for authentication or connection errors
Split Brain Scenarios
If network partitions occur, the split-brain resolver (keep-majority strategy) will keep the side with the majority of nodes. Monitor for:
- Nodes showing as Unreachable in the UI
- Logs indicating "SplitBrainResolver" actions
Recovery typically requires restarting isolated nodes after network connectivity is restored.
Summary
You now have a working multi-node layline.io deployment with:
- ✅ MySQL database for cluster persistence
- ✅ Configuration Server for web-based management
- ✅ Two reactive engine nodes forming a cluster
- ✅ Web UI configured for monitoring and operations
This architecture scales horizontally by adding more reactive nodes and provides the foundation for production deployments.
See Also
- Security Storage — Managing certificates and keys for secure cluster communication
- User and Role Management — Configuring access control across the cluster
- Gathering Statistics through Metrics — Monitoring cluster health and performance
- Quickstart: Install Locally — Single-machine installation for development