Mapping Flow Processor
Purpose
A common task during message stream handling is to map data from one format to another, based on their content. The obvious case would be a Workflow which sole purpose is format conversion, however, there are many use cases for this Asset in almost any Workflow. The Mapping Processor helps to accomplish this task based on simple mapping rules which you can edit using the UI.
Prerequisites
Before using this Asset, we recommend configuring the Formats you plan to use, first. This will help the Intellisense feature in the mapping configuration to help with the setup.
Configuration
Name & Description

-
Name: Name of the Asset. Spaces are not allowed in the name. -
Description: Enter a description.
The Asset Usage box shows how many times this Asset is used and which parts are referencing it. Click to expand
and then click to follow, if any.
Asset Dependencies
Use this section to add Formats which you plan to use as part of your filtering and routing rules.
Why do I have to add formats here?
Doesn't the system know which Formats I am using?
layline.io automatically understands when you are using Formats as part of your input and output processors and automatically mounts them at runtime.
But when you are referencing Formats which are not used as part of an input or output Processor directly, but rather referenced in
a Javascript Flow Processor or Quickscript, then the system may not be aware that you are using this format within
any of those scripts.
This would result in a runtime error.
To avoid this, you can explicitly mention the Formats you are referencing in your scripts. This ensures, that these Formats will always be mounted at runtime. So it is best practice to add Formats which are referenced in this Asset here.
To add formats click on Add Dependency and select the Format you wish to add as a dependency.
Repeat for any other Format dependency.
Input Ports
This Processor can have one or more input ports from which it receives data to process. It must have at least one input port, however.
A port can have a name and description. Names must exist and be unique within the Processor.
You can add an input port by clicking on Add Port, or remove an input port by clicking on Delete.
You cannot delete the port if it is the last one within the processor.
Output Ports
This Processor can have one-to-many Output Ports to send messages on within the Workflow.

A port can have a name and description. Names must exist and be unique within the processor.
Mapping Scenarios
A Mapping Scenario describes how one source data structure from the data dictionary should be mapped to a target data structure.
Example: Let's assume we are processing messages of three different types:
- Header
- Detail
- Trailer
In this case we would require three mapping scenarios, one for each type.
To perform mapping you should have a solid understanding of layline.io's Data Dictionary concept.
Adding a new mapping scenario
In this section you will define the actual format mapping. Initially no scenarios are configured.
Select Add a new scenario from the drop-down box:
Scenario Name and Description
Each Mapping Scenario must have a unique name and can have a description:
Source message and conditions
In this section you will define
- Which message type, and
- What other conditions
must be met to trigger the Mapping Scenario.
Source message that triggers the scenario
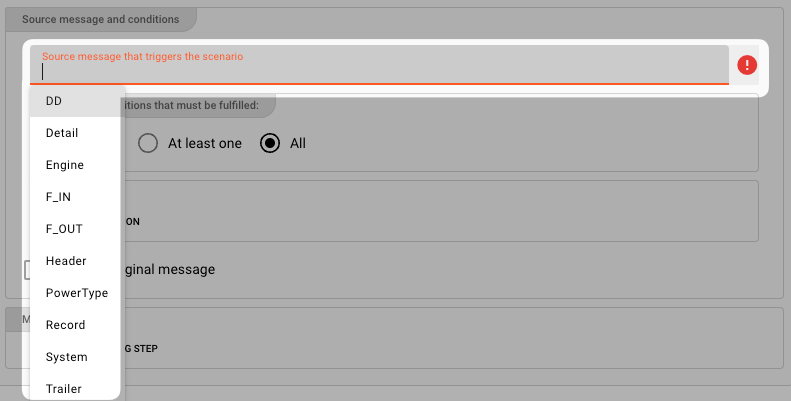
A specific Mapping Scenario is triggered by the discovery of a specific message type within the flow of messages in a Workflow. The type is defined through Format definitions (e.g. Generic Format, Data Dictionary Format, etc.). Select the message type upon which this Mapping Scenario should be triggered:

e.g.:
Make sure, that each Mapping Scenario refers to a distinct message type. You may otherwise encounter inconsistent results.
Condition Options
You can define additional conditions which need to be met for the Mapping Scenario to trigger:
Choose whether you want none, at least one (OR) or all rules (AND) of the configured conditions condition to be true in order for mapping to be considered:
-
None: There are no further conditions. -
At least one: At least one of the defined conditions must be met, for mapping to occur. -
All: All of the conditions have to be met for mapping to occur.
Conditions
In you picked either option At least one or All from the previous section, then you can now enter conditions for when the rule should evaluate to true.
Click ADD CONDITION to add your first condition.
You can then start entering conditions in Quickscript language:
The system will support you in this quest. When you start typing, you will be presented with options for autocomplete.
Let's fill in some conditions:

Explanation: This rule will now evaluate to true, if
- The message includes a data dictionary structure
Record.Boat, and - The length of the boat is greater than 10.
Depending on what you selected in the Condition Options, either all or at least one of these conditions must be met.
Enter as many conditions as necessary.
Message forwarding and updating
By default, the Mapping Flow Processor discards the original message and forwards the mapped message only. Many times, this is not the desired behavior. Instead, we may want to forward and/or update the original message with the mapped values:
-
Forward original message: The original messages is forwarded (output) from the Mapping Flow Processor. -
Update original message: The original messages is not only forwarded, but it's contents also updated with the mapped values. Use this, if you want to keep the original message and have it enriched with the mapped values.
Please note, that a mapped message will be output to all output ports which you have defined.
Mapping Steps
In this section you define the actual mapping which you want to execute.
Click ADD MAPPING STEP to add a mapping:
A new step is created.

There are four different types of mappings available:
- Simple mapping step
- Conditional mapping step
- Loop mapping step
- Create message step
The default is "Simple mapping step".
You can add as many steps as you require. Note, that the steps are executed in order. So if two mapping steps alter the same data, the last mapping step will prevail.
Each mapping step provides a number of operators which we explain here:
- + : Add another mapping step below the current one.
- ⌃ : Move the current step up in the hierarchy
- ⌄ : Move the current step down in the hierarchy
- 🗑 : Delete the mapping step
In general mapping works in the fashion left side (target) := right side (source).
When we define a mapping in the mapping steps (explained below), then we use the keyword target to address the target message, and source to address the source message.
target.F_OUT.FULL_NAME := source.F_IN.FIRST_NAME + " " + source.F_IN.LAST_NAME
# -> first and last name are combined and map to one field in the target message
In the example above fields "FIRST_NAME" and "LAST_NAME" from the incoming message (source), are mapped to field "FULL_NAME" in the target message. If you selected "Forward original message" and "Update original message" above, the mapping will happen within the same message. If you did not select these options, then the fields will mapped to the target message, and the target message will be forwarded, i.e. the source fields will not be present be in the target message.
Simple
Use this to define a "simple" mapping to a field (target) from other values in the message:
As the little "qs" icon to the right implies, and is shown in the example, you can use Quickscript here.
Conditional
Use this if you only want to perform mapping under certain conditions:

Loop
Use this to loop through a value either from the source or target message or an array (which you enter here).

Create message
Use this to create a brand-new message. You need to give the message a name and define its type. To define the type pick any of the types which you have already defined in the data dictionary.

Then add the various mapping steps to fill the message with data.
Add mapping step
FIXME
Failure Handling
Processing within a Flow Processor like this one can fail for various reasons. In this section you can define how the system should behave in case of such problems.
Failure Types
Four types of failures are observable:
| # | Failure observables / Reaction | Ignore | Retry Event/Message | Retry Stream | Rollback Stream |
|---|---|---|---|---|---|
| 1 | Stream start failure handlingA problem occurred in this Asset when starting a new stream. | ✔ | ✔ | ✔ | ✔ |
| 2 | Stream end failure handlingA problem occurred in this Asset when ending a stream. | ✔ | ✔ | ✔ | ✔ |
| 3 | Message failure handlingA problem occurred when handling a specific message in this Asset. | ✔ | ✔ | ✔ | ✔ |
| 4 | Rollback commit failure handlingA problem occurred during system issued rollback or commit procedure. | ✔ | ✔ | ✔ | ✔ |
Failure Type Reactions
Each of these failure types can be responded to with four different reactions:
Ignore
Don't do anything.
Rollback Stream
Rollback the complete stream. In the case of batch/file processing for example the complete file (which represents the stream) will be rolled back and put into error.
A rollback signal will be issued to all participating Workflow Processors. Each Processor needs to ensure itself how to deal with a rollback. A Javascript Flow Processor, for example, which directly interacts with a database will have to react to a rollback signal:
   function onRollback() {
    if (connection) {
        try {
            connection.rollbackTransaction();
            connection.closeConnection();
        } catch (err) {
        } finally {
            connection = null;
        }
    }
}
Retry Stream
Don't simply give up. Try to process the whole stream again. This option allows you to define how often and in what intervals the retries should be performed.

Stream Retry Settings
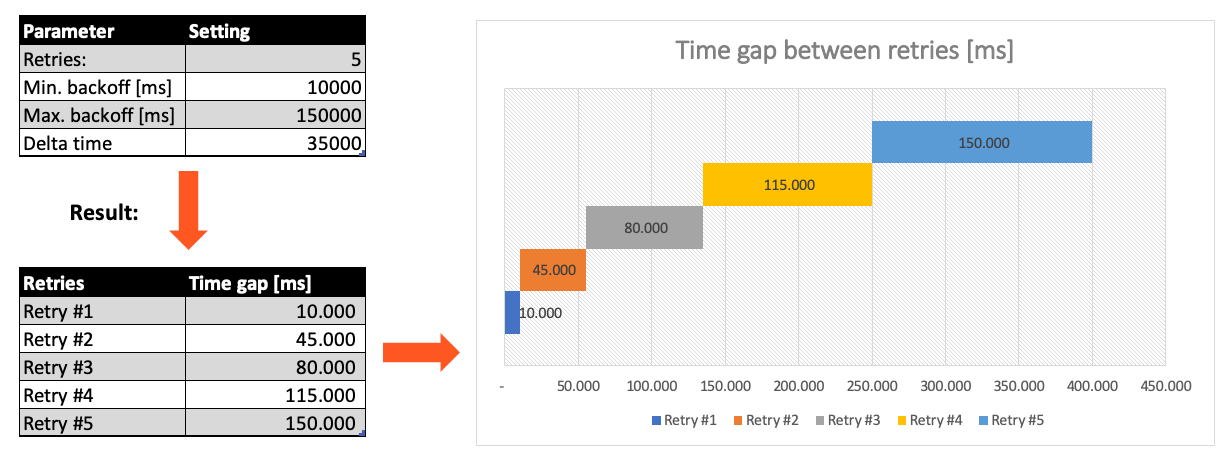
Max. Retries: The number of retries which should be performed. For example "5".Min. Backoff [ms]: Wait at least x milliseconds between each retry. For example "12000" (12 seconds).Max. Backoff [ms]: Wait at max x milliseconds between each retry. For example "150000" (150 seconds).
Based on these parameters, the system will try to balance the defined number of retries within the time boundaries of min. backoff and max. backoff. Taken the example numbers from above, the five retries would happen in this timespan:

Retry Event/Message
Pick this reaction if you want to retry processing the current message. As is the case with the Retry Stream reaction you can define how often and in what intervals the retries should be performed.

The settings are the same as with the Retry Stream reaction. So please refer to this.
There is one additional setting, however, which is When final retry failed.
You here have the option to decide what to do if the message cannot be processed, even after the final retry:
-
Ignore: Don't do anything. -
Rollback Stream: Fallback to rolling back the whole stream. -
Retry Stream: Retry the whole stream once again. If you pick this option, then you can again define all relevant Retry Stream parameters.
A Workflow has one Input Processor which is responsible for reading data from a Source. Sources are for example files, databases, or message queues.
The settings for Retry Event/Message and Retry Stream only work for specific Source Types which a Workflow uses.
These are:
Please note, that the creation of the online documentation is Work-In-Progress. It is constantly being updated. should you have questions or suggestions, please don't hesitate to contact us at support@layline.io .