Workflow Configuration
Logging in
If the installation went according to plan, and you have started the Configuration Center web interface, you are ready to log in.
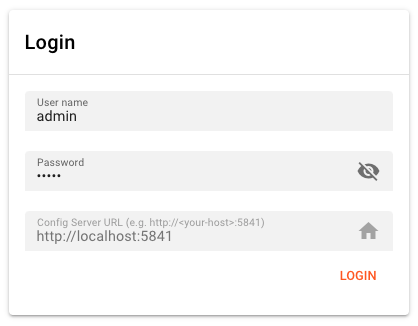
The Configuration Center only allows you to log in to the Configuration Server from which you invoked the Configuration Center in the first place. You cannot log in to another Configuration Server from within the same Configuration Center. It's alway a 1:1 relationship. This ensures that there are no overlaps between incompatible versions of Configuration Center and Configuration Server.
The default log in is always
- username:
admin - password:
admin
You should be logged in:

Make sure you change the password after installation.
Project
Structure of a Project
Before we create a Project, let's learn what it is:
A Project is the organizational structure in which you perform configurations. It contains one or more Workflows which are comprised of Processors. Processors in turn are manifestations of Assets._
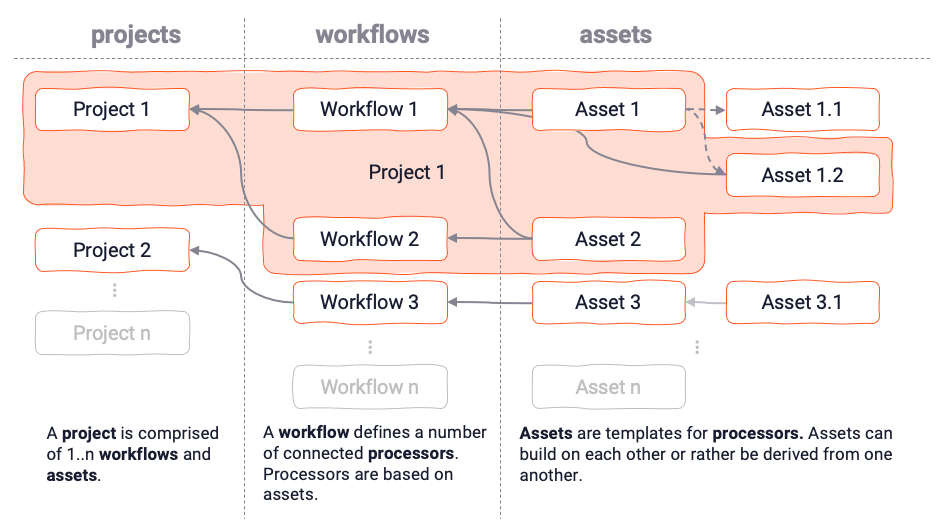
Don't worry if this sounds a little confusing at this point. It will all make sense when we go through an example.
Creating a project
- Click
CREATEin the Project toolbarProject name: Name of the ProjectProject description: Anything which describes the Project betterPath: This is the path to the directory where you want to store the project. For example, if you enter/Users/andrew/hello-worldthen a directoryhello-worldwill be created which will hold the project assets. You will get an error, if the path (apart from the last bit) does not exist.
On successful creation, the Project will be opened automatically in Asset View:
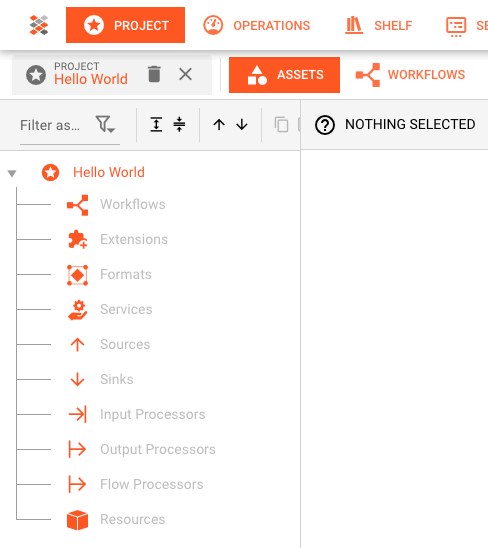
You see a tree with available Asset Classes. No Assets have been created yet.
Importing a Project directory
You may have a project in a directory structure which sits on your disk but is unknown to layline.io. This may look like this:
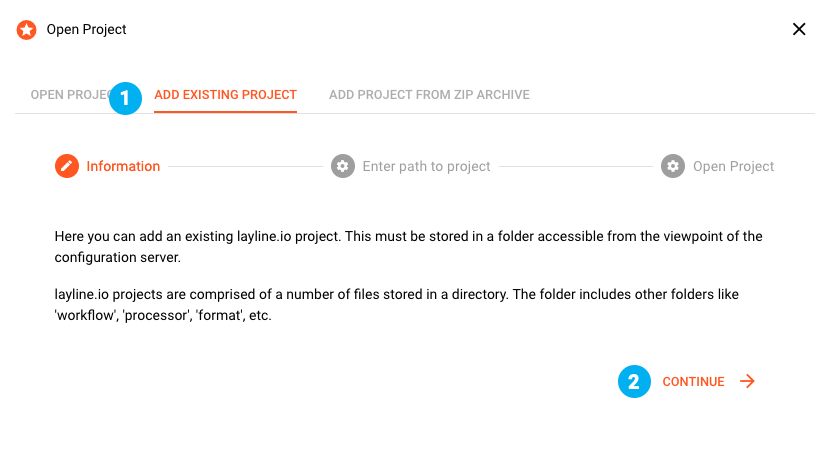
To make it aware to layline.io, you need to explcitly import it:
- Click
OPENin the Project toolbar- (1) In the opening dialog click on the
ADD EXISTING PROJECTtab - (2) Read the note and click
CONTINUE - (3) Enter the absolute path to the Project directory
- (4) Click
ADD PROJECT WITH GIVEN PATH
- (1) In the opening dialog click on the
If the path was found there will be a positive confirmation. Otherwise check whether the path is correct, or the project was previously added.
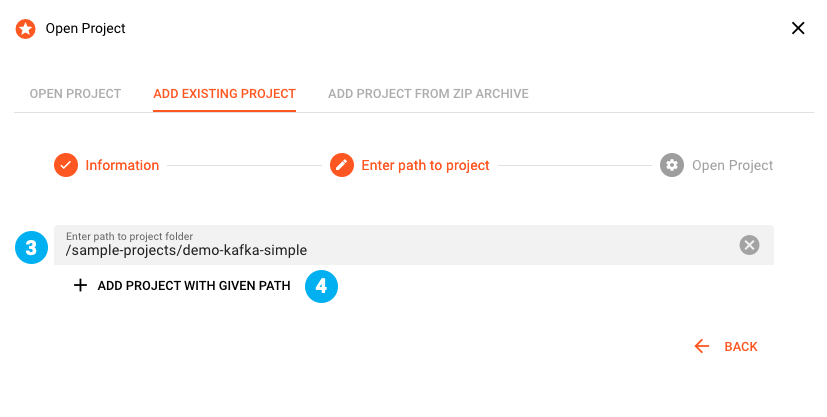
Close the dialog upon successful import.
Importing a Project zip file
You may have a Project in zipped format, which you had previously archived or received from someone else. To import the zipped archive:
- Click
OPENin the Project toolbar- (1) In the opening dialog click on the
ADD PROJECT FROM ZIP ARCHIVEtab - Read the note and click
CONTINUE. - (2)
Project name: Name of the Project - (3)
Project description: Anything which describes the Project better - (4)
Project version: Version number (free choice) - (5)
Path: This is the path to the directory where you want to store the project. - (6) Drag-and-drop the zip archive to this field for import.
- (7) Click
IMPORT PROJECT WITH GIVEN PATH
- (1) In the opening dialog click on the
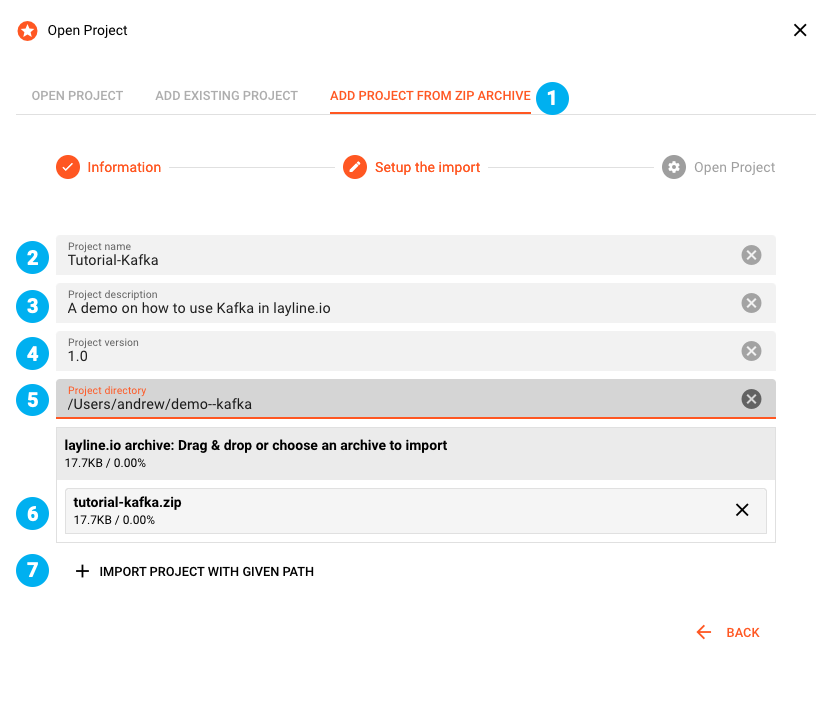
If all went well there will be a positive confirmation. Otherwise, check whether the path is correct, or the project was previously added.
Click CONTINUE to select whether you want to open the project which was just imported.
Remove a Project
You have two options to delete a Project:
Option 1: Remove from Project Open dialog
- (1) Click
OPENin the Project toolbar - (2) Pick the Project to delete from the list of available Projects
- (3) Note the directory where the selected Project is stored. You may need it later.
- (4) Click
DELETE PROJECTto remove the Project from layline.io
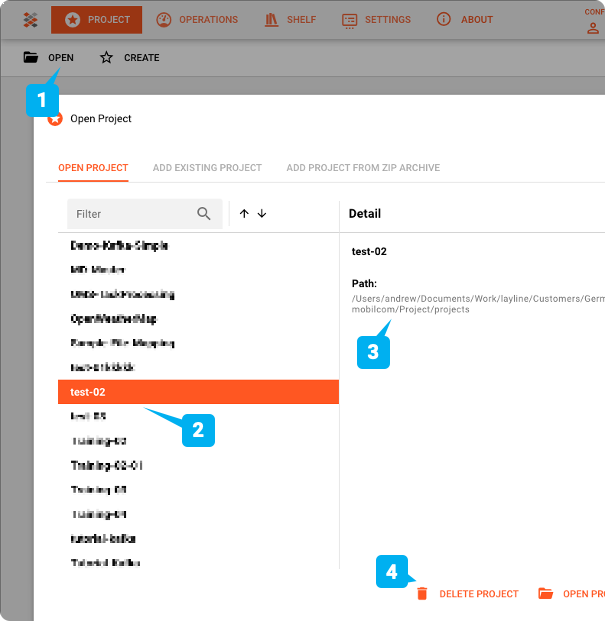
Option 2: Remove from Asset Editor
It is possible to delete an open Project:
Click on the bin icon (1) to delete an open Project
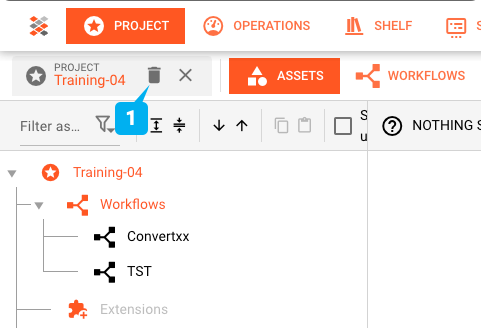
layline.io cannot physically delete the Project from disk (due to browser restrictions). To truly delete the Project, please use the means of the underlying operating system.
Assets
What are Assets?
Assets are best understood as basic function blocks. Let's look at some examples to get a better idea:
- S3 Source Asset: An Asset which knows how to read from an AWS S3 store.
- Javascript Flow Processor Asset: An Asset which can be programmed to fulfill tasks in very individual business logic.
- Kafka Output Processor Asset: An asset with the capability to output data to Kafka.
and so on.
Assets are of an Asset Class and an Asset Type.
Asset Classes
| Class | Meaning & Relevance |
|---|---|
| Workflows | Workflows describe a connected flow of Processors. It's a fundamental part of the configuration. Workflows are deployed to an Engine. A Project has 1..n workflows. |
| Extensions | Assets which are directly tied to a 3rd party product. Currently the only Extension is for Prometheus. |
| Formats | layline.io is data aware. It doesn't just push anonymous data packages around but understands the payload. Format Class Assets enable you to describe data formats which are being read, processed and written throughout the event data processing. |
| Services | A Service - as the name implies - can provide a service to other Assets. An example would be a database query which can be defined as a service and then be transparently invoked from within other Assets. |
| Sources | Sources provide the technical parameters to describe how layline.io can attach to a specific input data source, e.g. FTP, S3, File System, etc. |
| Sinks | As a counterpart to Sources, Sinks describe the technical parameters on how to connect to an output data sink |
| Input Processors | Input Processor Assets work in conjunction with Sources. They typically combine Sources and Formats plus a some additional. parameters to describe how data is being read. |
| Output Processors | Counterpart to Input Processor Assets |
| Flow Processors | These are specialized Assets which take messages in, and then apply a specialized task to it. Much like a workstation in a conveyor belt environment. |
| Resources | Resource Assets are relevant to define items which are used throughout the Project, such as environment variables, et al. |
Asset Types
Asset Types further define an Asset Class.
For example a S3 Source Asset is of class Source and of type S3.
Kafka Output Processor is of class Outputand of type Kafka.
This is not something you need to remember, but good to understand nonetheless.
You can find a detailed description of all available Assets and how they are configured, here.
Understanding Inheritance
When dealing with many Assets, and especially many Assets of the same kind, it can prove beneficial for Assets to build on one another. As an example, imagine you have configured a FTP Source Asset which connect to and reads from a specific directory on the remote server. You can define all of this in one FTP Source Asset. You now want to create another FTP Source which has the same parameters, except for the remote input directory.
In this case you can define an FTP Source Asset B which is derived from a FTP Source Asset A.
You can then override only the input directory settings in B and all other settings will be inherited from A.
If you change those inherited parameters in A they will be passed down to B if they are not overwritten in B.
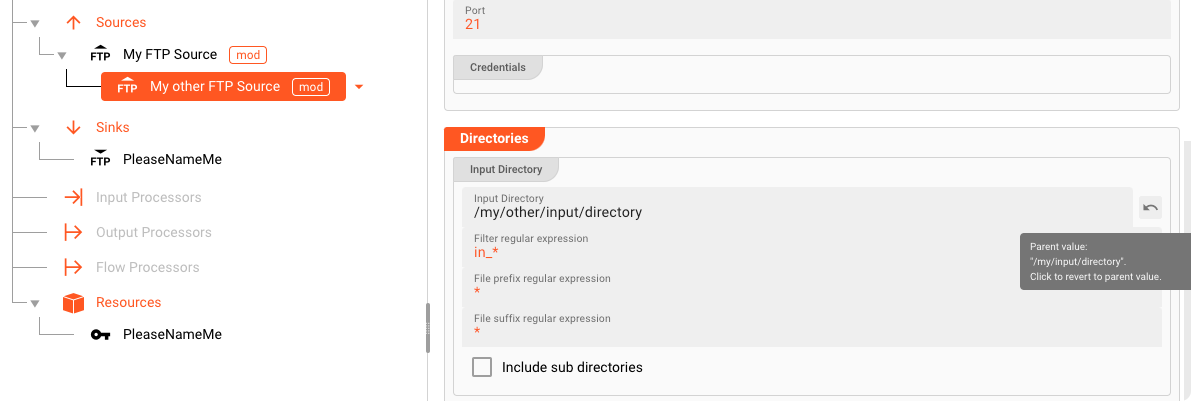
In the image below we are looking at a derived FTP Source Asset.
| Parent | Child |
|---|---|
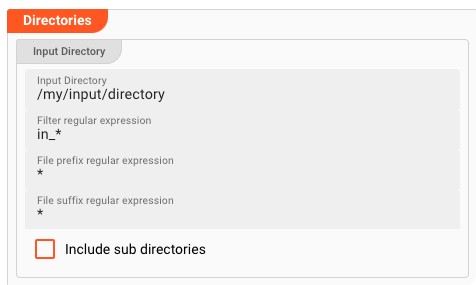 | 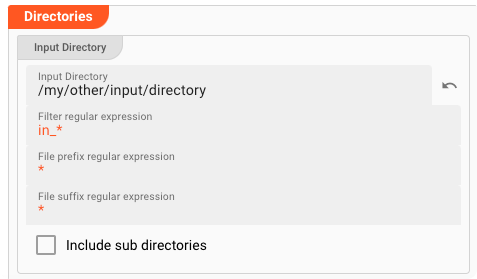 |
On the child, the overwritten property Input directory is written in black font and has an arrow next to the field.
If you click on that arrow, the content will default back to the parent's value and the font color will become orange.
Generally, inherited properties are in orange color which signals inheritance.
Workflows
Everything gets executed within the context of a Workflow. At least one Workflow is therefore required to process anything. Your individual scenario may require many Workflows, however.
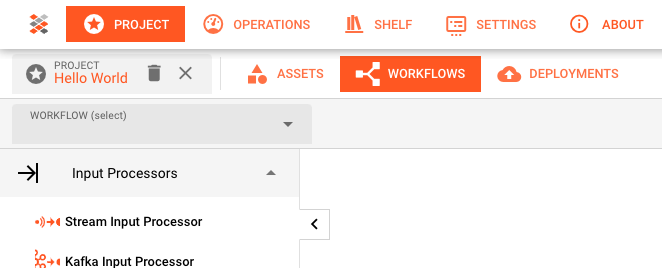
Workflows are configured on the Project --> Workflows Tab:
Anatomy of a Workflow
A Workflow is an assembly of Processor Instances.

There are generally three kinds of Processors with the following attributes:
| Type | Description | Cardinality | Occurrence |
|---|---|---|---|
| Input | Reading from a Source Asset | 1:n | once (!) |
| Flow | Processing Message Data | m:n | many |
| Output | Writing to a Sink Asset | m:1 | many |
(Please note, that you can only have one Input Processor per Workflow.)
Creating a Workflow
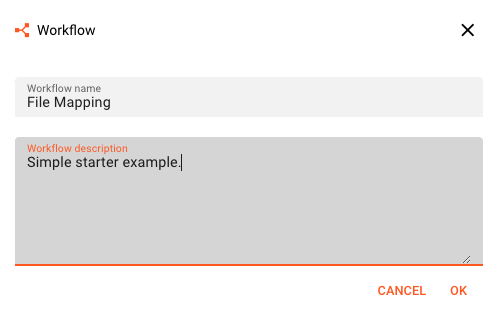
You typically create a Workflow by clicking on the drop-down and then selecting "_Add a new workflow".

Then enter the details:
You see the empty canvas. On the left is the palette from which you can drag the available processors. The list is constantly extended. On the right you see the details of the selected Processor Instance. Since there is no Processor on the canvas to be selected (yet), the Workflow Asset is selected as a default.
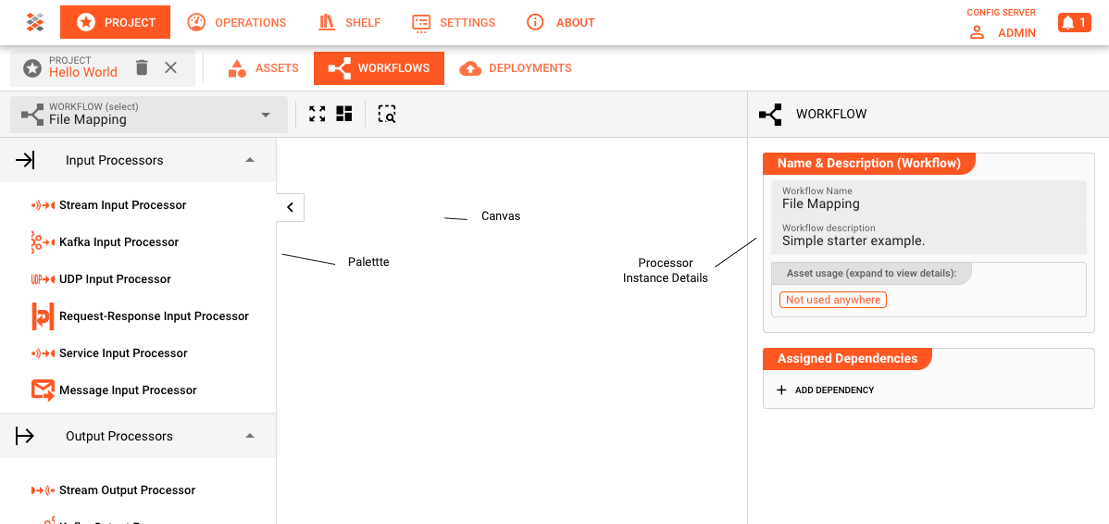
Adding Processors to the Workflow
Let's create a simple Workflow which maps the content of a file from one format to another.
Adding an Input Processor
Drag and drop a Stream Input Processor from the Palette on the left side onto the canvas.
A dialog will open, asking some basic parameters:
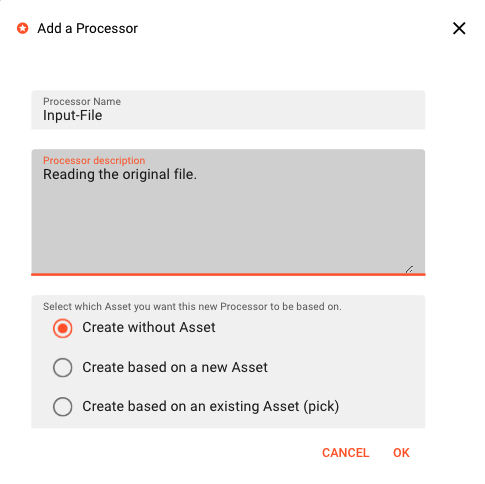
Enter a Processor Nameand an optional Processor Description.
Below these fields you have three options to decide how this new Processors should be created:
Picking the creation type
| # | Creation type | Meaning | When to use |
|---|---|---|---|
| 1 | Create without Asset | The Processor will be created without a global Asset associated with it. No Asset will be created alongside this Processor for later reuse. Nothing is inherited and you can only change the parameters of this Processors in the Workflow view. | 1. You do not plan to reuse this Processor and its settings anywhere. It's pretty unique. 2. Your Project is small and can easily be overseen. |
| 2 | Create based on a a new Asset | Not only will this Processor be created, but also a new Asset with it. You will find an associated Asset in the Asset View after creation. The new Processor is based on this new Asset. | You plan to reuse the Asset elsewhere in the same or a different Workflow; potentially with minor modifications. |
| 3 | Create based on an existing Asset (pick) | The new Processor will be based on a an Asset which was previously created. All parameters will be inherited from this Asset. Minor modifications for the created Processor Instance may make sense and can be applied. | You have an Asset which you want to reuse by applying it to this new Processor. |
For the purpose of this example pick option #1 Create without Asset. You will see the newly created Processor marked and it's parameters on the right side panel.

Adding an Output Processor
Add a Stream Output Processor from the Palette. This time, select Create based on a a new Asset. Name it "Output-File".
Adding a Mapping Processor
Add a Mapping Processor. Select Create based on a a new Asset also. Name it "Mapping".
Connect the ports on the Processors:
Input FiletoMappingMappingtoOutput File
The Workflow looks like this now:

Check the Asset Viewer
The last two Processors which were added with the option Create based on a a new Asset, should now have auto-added new Assets in the AssetViewer. We can have a look by switching over to it:
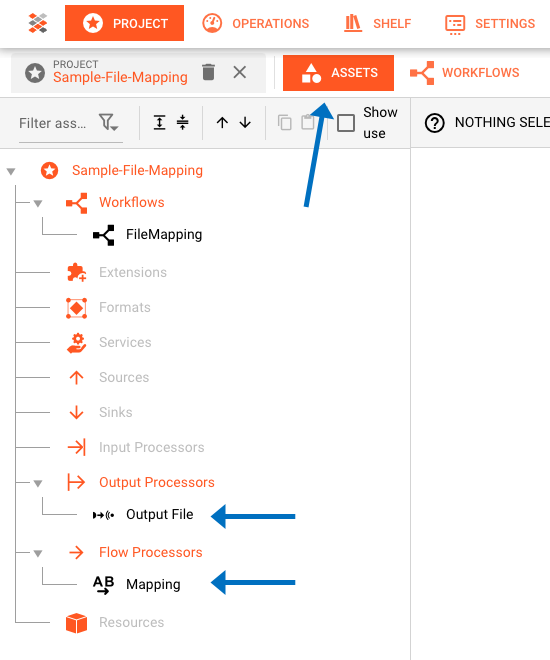
Adding Formats
Our Workflow knows which Processors exist, that it should input and output data, and which direction the data travels. The Workflow at this point does not yet know how exactly from where to read and write the data, or what the data actually looks like. We need to do a little more to make it work.
We are adding the Input Format by adding a Generic Format.

layline.io allows you to define almost any structured data format by way of a Format Grammar. At this point we will not define how the Format Grammar works, just that it's based on regular expressions.
In the Format Definition section of the Format, we simply insert the following:
::: details Format Definition
format {
  name = "Bank Transactions"
  description = "Random bank transactions"

  start-element = "File"
  target-namespace = "BankIn"

  elements = [
    // #####################################################################
    // ### File sequence
    // #####################################################################
    {
      name = "File"
      type = "Sequence"
      references = [
        {
          name = "Header"
          referenced-element = "Header"
        },
        {
          name = "Details"
          max-occurs = "unlimited"
          referenced-element = "Detail"
        },
        {
          name = "Trailer"
          referenced-element = "Trailer"
        }
      ]
    },

    // #####################################################################
    // ### Header record
    // #####################################################################
    {
      name = "Header"
      type = "Separated"
      regular-expression = "H"
      separator-regular-expression = ";"
      separator = ";"
      terminator-regular-expression = "\n"
      terminator = "\n"

      mapping = {
        message = "Header"
        element = "BT_IN"
      }

      parts = [
        {
          name = "RECORD_TYPE"
          type = "RegExpr"
          regular-expression = "[^;\n]*"
          value.type = "Text.String"
        },
        {
          name = "FILENAME"
          type = "RegExpr"
          regular-expression = "[^;\n]*"
          value.type = "Text.String"
        }
      ]
    },
    // #####################################################################
    // ### Detail record
    // #####################################################################
    {
      name = "Detail"
      type = "Separated"
      regular-expression = "D"
      separator-regular-expression = ";"
      separator = ";"
      terminator-regular-expression = "\n"
      terminator = "\n"

      mapping = {
        message = "Detail"
        element = "BT_IN"
      }

      parts = [
        {
          name = "RECORD_TYPE"
          type = "RegExpr"
          regular-expression = "[^;\n]*"
          value.type = "Text.String"
        },
        {
          name = "DATE"
          type = "RegExpr"
          regular-expression = "[^;\n]*"
          value = {
            type = "Text.DateTime"
            format = "dd-MMM-uuuu"
          }
        },
        {
          name = "DESCRIPTION"
          type = "RegExpr"
          regular-expression = "[^;\n]*"
          value = {
            type = "Text.String"
          }
        },
        {
          name = "DEPOSITS"
          type = "RegExpr"
          regular-expression = "[^;\n]*"
          value = {
            type = "Text.Decimal"
          }
        },
        {
          name = "WITHDRAWALS"
          type = "RegExpr"
          regular-expression = "[^;\n]*"
          value.type = "Text.Decimal"
        },
        {
          name = "BALANCE"
          type = "RegExpr"
          regular-expression = "[^;\n]*"
          value = {
            type = "Text.Decimal"
          }
        }
      ]
    },
    // #####################################################################
    // # Trailer record
    // #####################################################################
     {
      name = "Trailer"
      type = "Separated"
      regular-expression = "T"
      separator-regular-expression = ";"
      separator = ";"
      terminator-regular-expression = "\r?\n"
      terminator = "\n"

      mapping = {
        message = "Trailer"
        element = "BT_IN"
      }

      parts = [
        {
          name = "RECORD_TYPE"
          type = "RegExpr"
          regular-expression = "[^;\n]*"
          value.type = "Text.String"
        },
        {
          name = "RECORD_COUNT"
          type = "RegExpr"
          regular-expression = "[^;\n]*"
          value.type = "Text.Integer"
        }
      ]
     }
  ]
}
:::
Looking at the content, you should get the idea on how data formats can be configured using the Generic Format Asset.
Adding a Source and Sink Asset
A Source Asset defines a message data source and how data can be read form that source. A File Source Asset for example defines directories to read from, file patterns, etc.
A Kafka Source Asset defines which Kakfa topic to read from. And so on.
It's the same for the Sink Assets except that there it's all about where and how to write data.
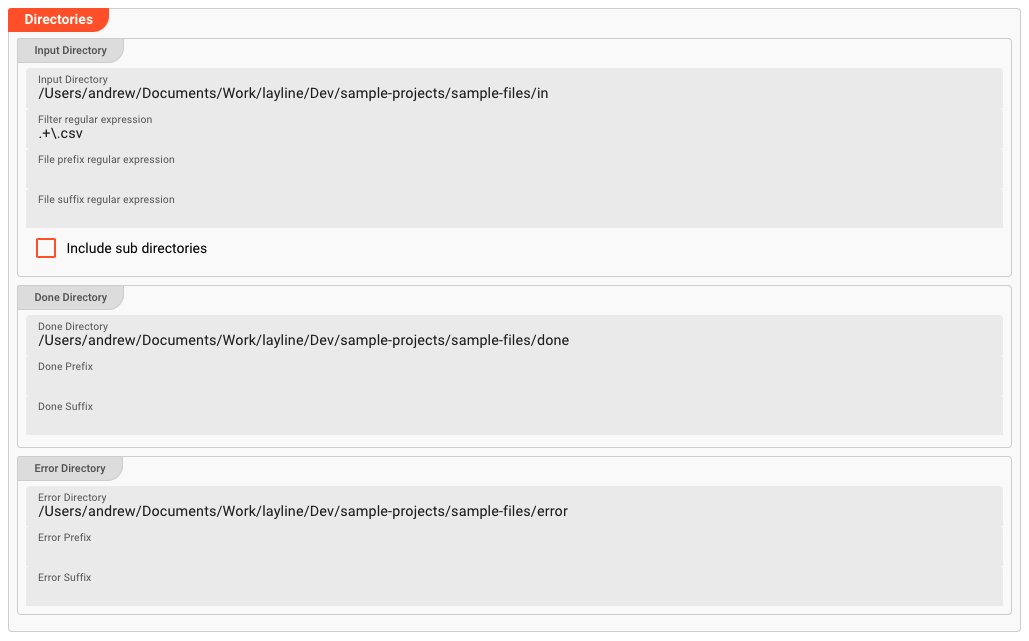
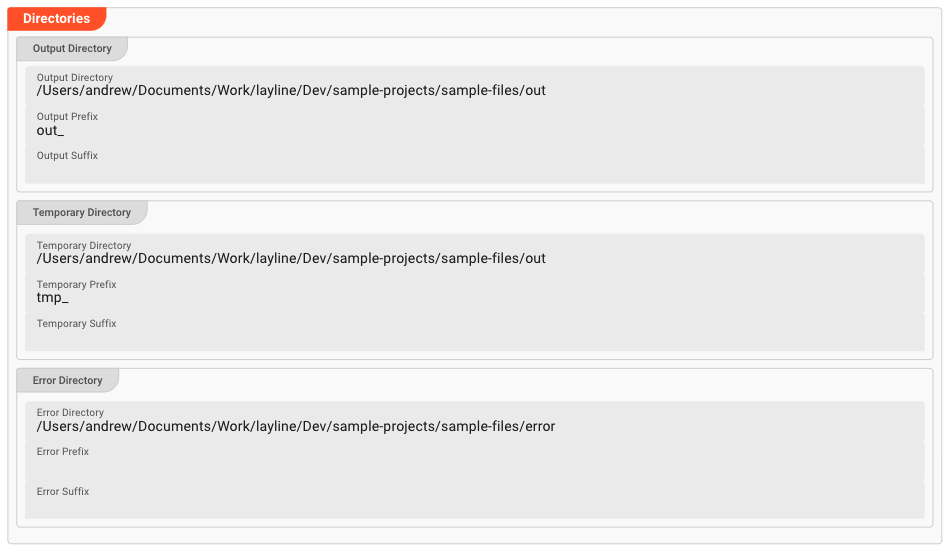
Our Workflow requires both a File Source Asset and a File Sink Asset. Let's add it in Project --> Assets --> Source and Sink:
For the Source Asset we simply name it "Input Source" and define the directories as follows (adjust to your environment):
The Output Source Asset is named "Output Source" and the directories are defined like this:
Assigning the Format, Source and Sink to Input and Output
The Input File Processor and Output File Asset which we have defined earlier, both do not yet understand
- where to read from (input) or write to (output), or
- how to decode/encode the data being read and written.
Assigning Source and Format to the Input File Processor
- Go to the Workflow Viewer
- Click on the Input File Processor

- Assign Format and Source by clicking the icons next to the fields

Assigning Sink and Format to the Output File Asset
Our Output File Processor is based on an Asset (this is how we configured it above). Therefore if we assign a Sink and a Format to the Output Asset, it will automatically be inherited by the Output File Processor in the Workflow, since it is based on this Asset and inherits its values, unless overwritten.
The Asset config:

The resulting File Output Processor config in the Workflow:

Adding a Mapping Asset
The example we are working is really only to show how layline.io works in principle. So in our example we do a very simple format conversion. For this purpose we are adding a Mapping Asset. To do so we go to Project --> Assets --> Flow Processors and add the Mapping Asset there.
We set the following parameters:
Assign the File Input Format as a Dependency
We need to add the File Input Format as a dependency since we will be addressing it in the mapping.

Mapping Header, Detail, and Trailer
We are mapping the incoming data to the format of the outgoing data. We need to create mappings for each "record format" of Header, Detail, and Trailer which we want to map to the outside. We do so in the "Mapping Scenarios" section.
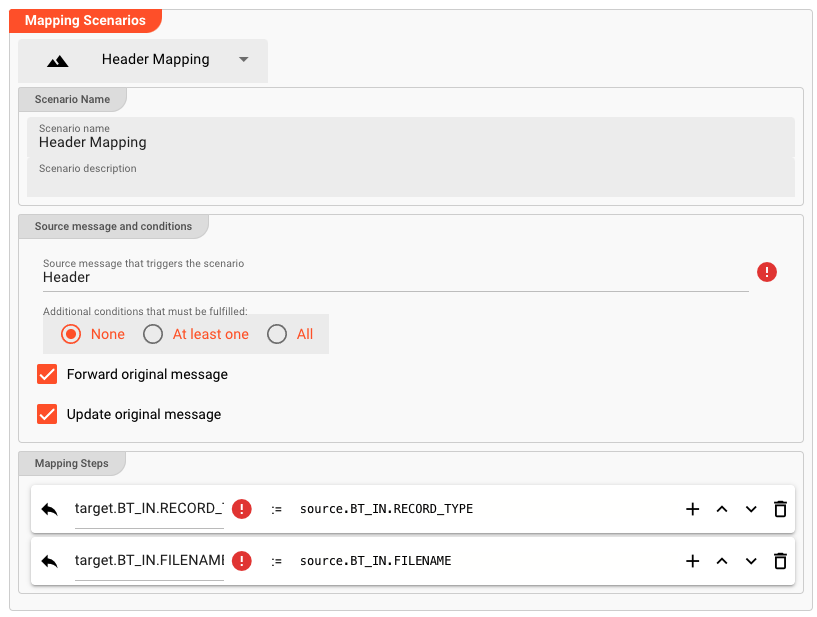
We repeat this for Detail and Trailer records. Overall we have entered the following data:
// Header Mapping
Scenario Name: "Header Mapping"
Source message that triggers the scenario: "Header"
Additional conditions: "None", "Forward", and "Update"
Mapping Steps:
- target.BT_IN.RECORD_TYPE := target.BT_IN.RECORD_TYPE
- target.BT_IN.FILENAME := target.BT_IN.FILENAME

// Detail Mapping
Scenario Name: "Detail Mapping"
Source message that triggers the scenario: "Detail"
Additional conditions: "None", "Forward", and "Update"
Mapping Steps:
- target.BT_IN.RECORD_TYPE := target.BT_IN.RECORD_TYPE
- target.BT_IN.DATE := target.BT_IN.DATE
- target.BT_IN.DESCRIPTION := target.BT_IN.DESCRIPTION
- target.BT_IN.DEPOSITS := target.BT_IN.DEPOSITS
- target.BT_IN.WITHDRAWALS := target.BT_IN.WITHDRAWALS
- target.BT_IN.BALANCE := target.BT_IN.BALANCE

// Trailer Mapping
Scenario Name: "Trailer Mapping"
Source message that triggers the scenario: "Trailer"
Additional conditions: "None", "Forward", and "Update"
Mapping Steps:
- target.BT_IN.RECORD_TYPE := target.BT_IN.RECORD_TYPE
- target.BT_IN.RECORD_COUNT := target.BT_IN.RECORD_COUNT
Result
At this point we have completed the Workflow and Asset Configuration. As a result we do have
- one Workflow with three Processors
- a number of Assets which are associated to the Processors in the Workflow.
The following image depicts our sample Workflow and how Assets are logically assigned to Processors:

Summary
In this part of the documentation we have learned how to set up a simple Workflow from zero. You may say, that you can convert a simple file from one format to another even with a just a few Linux CLI tools. True. But this is not what layline.io is about.
What you get is a machine which allows you to
- create extremely complex event data processing scenarios,
- scale processing up/down through a few clicks or automatically,
- run a 24/7 resilient scenario,
- distribute processing logically and geographically,
- monitor and log everything through the UI or mainstream monitoring tools,
- and much more.
Imagine that we now
- add more Workflows,
- with more complex processing, and
- more interfaces, to
- process millions, hundreds of millions, billions of messages every day,
- from and to many different sources and sinks
- in real-time.
You get the idea.
We are now ready to deploy and test the Workflow.