Aerospike Service
Purpose
Define a service to interface with an Aerospike store.
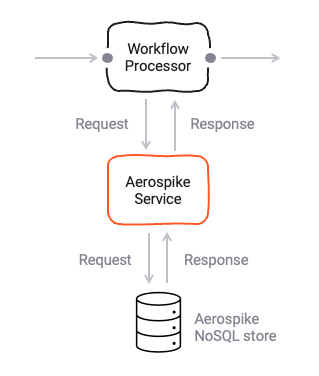
Please note, that the Aerospike Service for the moment only supports Aerospike primitive data types.
Prerequisites
None
Configuration
Name & Description
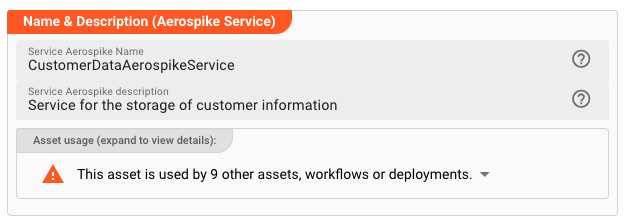
-
Name: Name of the Asset. Spaces are not allowed in the name. -
Description: Enter a description.
The Asset Usage box shows how many times this Asset is used and which parts are referencing it. Click to expand
and then click to follow, if any.
Required roles
In case you are deploying to a Cluster which is running (a) Reactive Engine Nodes which have (b) specific Roles
configured, then you can restrict use of this Asset to those Nodes with matching
roles.
If you want this restriction, then enter the names of the Required Roles here. Otherwise, leave empty to match all
Nodes (no restriction).
Hosts
This is where you define the host seed node address(es) which can be used to connect to an Aerospike cluster.

The Aerospike Service will first try to connect to the first seed node you provide. If you have provided multiple seed nodes the service iterates through the array of nodes until it successfully connects to a node. Once a connection has been established all other nodes within the Aerospike cluster will be automatically discovered by the service.
Retries & Timeouts
For the purpose of sturdiness in communicating with the Aerospike cluster, you may define retries and timeouts. This allows the system to retry requests in case they don't go through or are acknowledged the first time. Please note that this settings applies to all communications. So in this case all reads, writes, and delete requests.
-
Max. retries: Maximum number of times the system should retry to issue request. -
Socket timeout [ms]: Timeout in milliseconds until a request is considered failed. -
Total timeout [ms]: Timeout in milliseconds for all retries in total combined. Here you can define that you do not want to wait any longer than x milliseconds regardless of the number of retries.
Introduction to CRUD operations on Aerospike with the Aerospike Service
CRUD is a general term to describe Create, Read, Update (or write), and Delete operations in stores in general. Within the Aerospike Service all operations are possible, with some limitations which we will discuss.
Create
In Aerospike, data structures exist by inserting them. There is no actual “create” operation equivalent to a relational database, for example. In that sense, data is created by the equivalent of “write” operations. Therefore, “create” operations can be performed by “write” operations from this Aerospike Service Asset.
In this Aerospike Service Asset there is no support, to dynamically create structures (equivalent to DDL operations). Namespaces, Sets and Bins are statically defined in this Asset.
Read, Update and Delete Operations
Read, update and delete Operations are all supported. Aerospike - as a key-value-store - has many degrees of freedom in regard to what is actually stored in the value part of a record. It is for example possible to create a record with no Bins, the next with one Bin, and the next with three Bins. There is no underlying schema.
layline.io, however, requires some structure in order to map Aerospike data to layline.io and vice versa. It is therefore required to work with Aerospike Namespaces, Sets, and Bins. Bins would be the considered the same as fields within a traditional RDBMS schema, and map to fields within layline.io’s message structure.
Supported Data Types in Bins
Aerospike supports a number of different data types, not all of which are supported by this Aerospike Service Asset. Supported are:
- Boolean
- Byte
- Bytes
- Double
- Float
- Integer
- Long
- String
Other data types custom to Aerospike are currently not supported. Drop us a note in case you require them. For further information on Aerospike’s data types check their documentation.
Two ways on how to work with data in the Aerospike Service
You have two options on how to work with data in Aerospike using this Service:
- Service Functions
- Collections
Service Functions allow you to define a schema that you either want to read, write, or delete from/to. You can for example define a Function which writes a specific Bin in a given Namespace and Set, and name the Function “UpdateThisSpecificField”.
Collections on the other hand allow you to define a schema and will automatically create respective read, write, AND delete from/to methods. You can for example define a Collection “CustomerData” which configures access to a Namespace, Set, and Bins, and the Collection will automatically provide read, write, and delete methods.
Use Functions if you want to have granular control over what you want to do (read, write, delete), and use Collections for a more convenient and general way to read, write and delete from/to a configurable schema.
There is a good chance that defining Collections will be easier and sufficient for you. You can use Functions and Collections concurrently, however.
Please note that a Collection as defined here is not equivalent to Aerospike’s Collection data type.
Example
For the purpose of further explanation, let's make up an example. Let's assume we want to work customer data. For each customer Aerospike stores a value which contains
- a phone number (MSISDN) and
- an array of history records which contain additional information in additional fields.
The logical record structure looks like this:
{
  "MSISDN": "017212345678",
  "History": [
    {
      "ValidFrom": "2021...",
      "ValidTo": "2021...",
      "Provider": "XYZ",
      "PaymentType": "PT"
    }
  ]
}
Let's further assume that in Aerospike this is stored in a Namespace/Set/Bins setup like so:
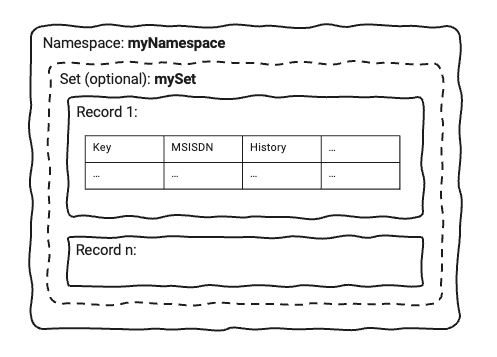
In our example, records are stored with the MSISDN as the key.
Service Functions
As explained above, Service Functions allow you to define a granular method to either read, write, or delete from/to a Aerospike Namespace/Set/Bins combination.
Let’s assume we would only want to read the Bin MSISDN from our example.
Create Service Function
First create a new Function (1):
Next fill out the details:
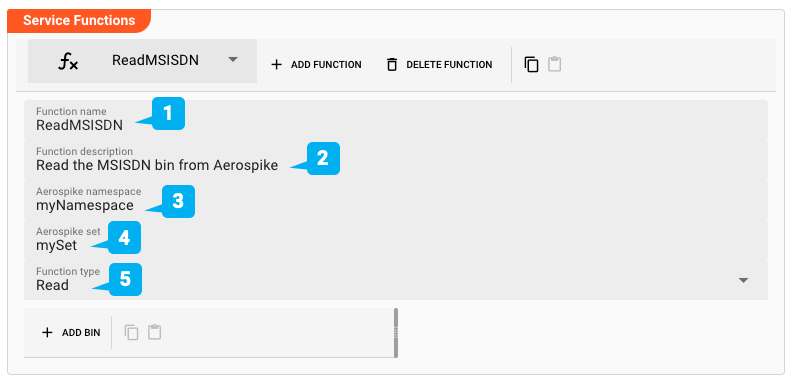
-
Function name(1): The name of the function. Must not have whitespaces. -
Function description(2): Something which describes the function (optional). -
Aerospike namespace(3): The name of the Aerospike namespace. -
Aerospike Set(4): If the records within Aerospike are grouped into sets, then enter the set name here. This is optional. -
Function type(5): Pick eitherRead,Write, orDelete. In our example we pickRead.
Create MSISDN Bin
Configure the MSISDN Bin from our example.
To create the Bin click on ADD BIN . This will create a Bin we want to read in this Function.

Enter additional values:
Bin
Aerospike bin name(2): Name of the Bin. Must be the name of the Bin in Aerospike.Aerospike bin type(3): This is the type of how the data is stored in Aerospike. Note that Aerospike automatically deduces the data from its content.Property name in parameter/result message(4): This is the property name of how the value of the Bin will be read and set within layline.io’ internal message structure. This become clear when we describe how the data is referenced when working with it.
Encoding - Internal encoding. This defines how the value from the Bin is treated within layline.io. This is
important to understand: We always need to define how we can map an external value - in
this case from Aerospike - to an internal structure and vice versa. It’s relatively simple for primitive data types,
e.g. a Bin of type String in Aerospike is a String in layline.io. It gets more
interesting with complex data types. This is where Data Dictionary definitions come into play. We will look at this in
more detail when defining the History Bin a bit further below.
-
Encoding type(5): You use the encoding type to define how values and structure are decoded into layline.io structures when reading from the source, an encoded respectively when writing to the source (Aerospike). You can choose between three different encoding types:Value(5): This option supports one-to-one mapping of primitive encoding types, e.g. String to String, or Boolean to Boolean. You can also map a String to an Integer for example which will map a number which is stored in a String on Aerospike into an Integer on layline.io. Be careful, however, because these implicit type conversions must work or it will create an error.
Data Dictionary: This option will allow you to define a complex structure by way of defining a Data Dictionary structure. We will go through an example in the next chapter.
Format: This option will allow you to reference a Format which you have defined previously. An example would be that the Bin holds a comma separated record structure for which you have defined a Generic Format . If you assign this Format here, then it will be applied to decode the bin content using this Format, as well as encode the structure when writing the data. This is extra helpful in the case that the content of a Bin is of a structure which cannot easily be defined using a Data Dictionary structure (see below), for example. Let’s assume the Bin contains an ASN.1 encoded structure, you can then first define a ASN.1 format and assign it here for decoding and encoding the data respectively.
Result
We now have defined a Service Function which can read an Aerospike Namespace, Set, and one Bin MSISDN with a
given key.
To understand how to then use this Function please check chapter Using the Aerospike Service
Collections
Collections in this context describe a schema like structure. Imagine in Aerospike you have a Namespace, and Set with a number of defined Bins in the records of that Set. A Collection would describe exactly that structure. Once defined it automatically provides all functions necessary to read, write, and delete data from that structure.
Configure the Collection
We use the UI to configure the Collection first. Click ADD COLLECTION to create a new Collection (1):
A Collection will be created. Next we enter the Collection details:
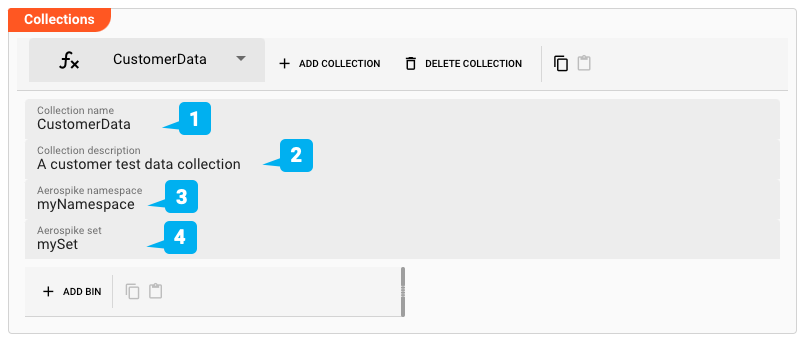
-
Name & Description(1, 2): Enter the name and a description (optional) of the Collection. The name is mandatory and must be unique within the Service. You may not have a Function by the same name. It may not contain spaces. -
Namespace(3): The name of the Aerospike namespace. -
Set(4): If the records within Aerospike are grouped into sets, then enter the set name here. This is optional.
In the following step we need to define the structure within the Collection. Please check above for the structure we are trying to define (two Bins).
Configure the MSISDN Bin
This is the same as in chapter Create MSISDN Bin
Configure the Data Bin
In our example we still need to configure the Data bin.
Defining a complex data type Because the Data bin is not a primitive type, we first need to define the complex type which it has. Go to the following chapter “Data Dictionary” to learn how it is configured; then return here to complete to configuration.
Now that we have added the History data type we can actually add the History Bin:
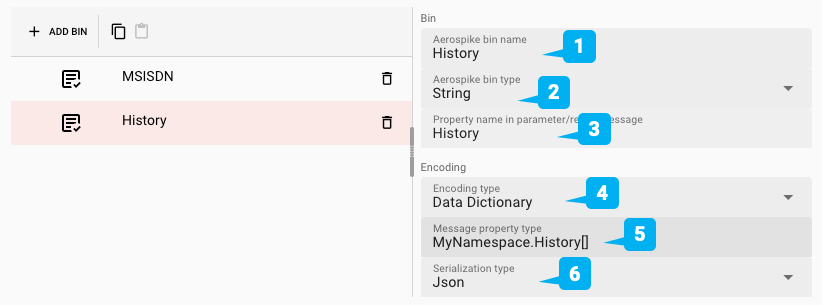
For our example:
Bin
-
Aerospike Bin Name(1): The name of the Aerospike Bin:History. -
Aerospike Bin Type(2): The data is stored as aString. -
Property name in parameter/result message(3): Use the same nameHistoryto later reference the data within layline.io.
Encoding
-
Encoding type(4): PickData Dictionaryfrom the list. This is necessary to reference the data type in the next step, which we have defined in the Data Dictionary (next chapter). -
Message property type(5): Now enter the access path to the data type:MyNamespace.History[]. Note that we have added a[]at the end of the data type to mark it as an array of this type. -
Serialization type(6): PickJson. This means that data read from this Aerospike Bin will be deserialized to Json format, and serialized from Json to string when written.
Automatically generated Functions
When defining a Collection, layline.io automatically creates three different functions for reading, writing, and
deleting data from/to the Collection. For the Collection CustomerData which we have
created, the following functions will be created:
| Function | Signature | Returns | Description | Example |
|---|---|---|---|---|
| Read | services.<Logical Service Name>.Read<BinName>(key: String) | Message or null of nothing found | Read data from Aerospike | services.CustomerData.ReadCustomerData({Key: "017212345678"}) |
| Write | services.<Logical Service Name>.Write<BinName>(key: String, Bin: {...}, WritePolicy: {...}) | null | Write data to Aerospike | services.CustomerData.WriteCustomerData({Key: "017212345678", Bin: {...}, WritePolicy: {...}}) |
| Delete | services.<Logical Service Name>.Delete<BinName>(key: String) | Message or null if nothing deleted | Delete data from Aerospike | services.CustomerData.DeleteCustomerData({Key: "017212345678"}) |
As you can tell, a Collection name is simply prepended by Read, Write, and Delete for the respective functionality.
If you only want to have a Read function you can achieve the same by configuring a corresponding Function, instead of
a Collection.
Result
We now have defined a Collection which references an Aerospike Namespace, Set, and two Bins MSISDN
and History with a simple and complex type.
Data Dictionary
The Data Dictionary allows us to define complex data structures which can be mapped onto Aerospike data types (e.g. String).
As an example, let’s configure the History Bin from our example above. The History Bin is a more complex type in
that it contains data formatted in JSON. In Aerospike this is simply stored as a
String. In layline.io, however, we want to be able to access the individual data within that JSON format as individual
fields. To solve this, we can define our own data types using the Data Dictionary
which reflects the JSON format stored in Aerospike and vice versa.
{
  "History": [
    {
      "ValidFrom": "2021",
      "ValidTo": "2021",
      "Provider": "XYZ",
      "PaymentType": "PT"
    }
  ]
}
Let’s define this custom data type using the Data Dictionary:
- Declare namespace
- Declare
History
Declare a new type (1):
1. Declare namespace
To better organize data types, we declare a namespace first:

-
Name(1): The name of the element. If you are configuring a namespace, and you reuse the name of a namespace, which you have created elsewhere in this Project, then the elements of the namespaces will be merged into the namespace by this same name. Otherwise the name must be unique and may not contain spaces. -
Type(2): Pick the type of the element. In our example we first define a namespace. When we define additional elements under that namespace we will pick any of the other data types to actually hold the data. -
Description(3): Anything which describes the element further.
2. Declare History
Add a child to the namespace we just created:

- Click the small arrow next to the namespace name (1)
- Select
Add childto add a child element to the namespace - Fill in the details:
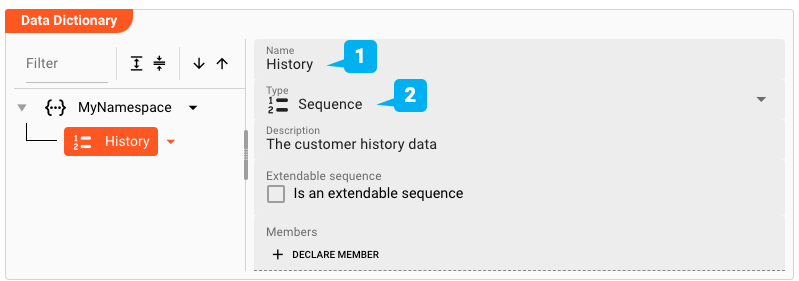
-
Name(1): Name the elementHistory -
Type(2): SelectSequenceas the element type. In the next step we will create individual members of the sequence. -
Extendable Sequence(3): Leave this unchecked for the example. If checked, it allows you and layline.io to dynamically extend the list of sequence members while working with the data type which we are defining. If - for example - your incoming data format has additional fields which are not defined in the sequence, the sequence will be automatically extended by these fields.
Now we add a list of member fields which make up the sequence (1):
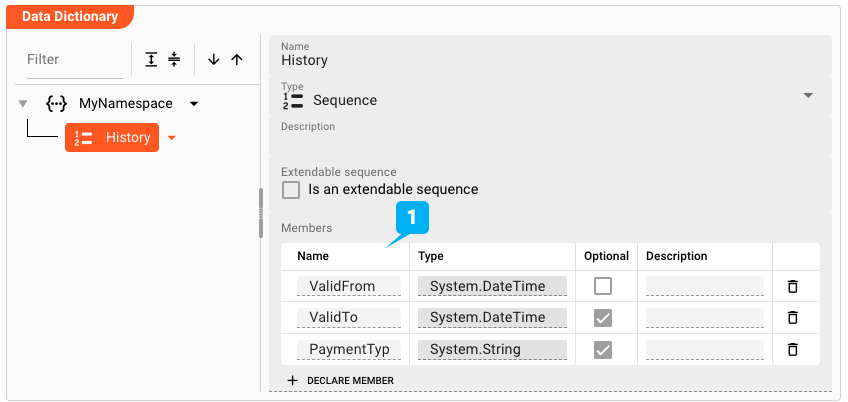
To later reference the ValidFrom field, we can use the path MyNamespace.History.ValidFrom, and so forth.
Example: Using the Aerospike Service
The Aerospike Service can be used from within a JavaScript Asset. In our example we have a simple Workflow which reads a file with communication records of customers (1), then in a next step (2) reads corresponding history data from Aerospike, and simply outputs this data to the log. There is no other purpose in this Workflow than to demonstrate how to use the Service.

In the middle of the Workflow we find a JavaScript Processor by the name of “Tap3Debug”. This Processor reads additional customer information from Aerospike using the Aerospike Service.
How is it configured?
Link Tap3Debug Processor to Aerospike Service
To use the Aerospike Service in the JavaScript Processor, we first have to assign the Service within the JavaScript Processor like so:

-
Physical Service(1): The Aerospike Service which we have configured above. -
Logical Service Name(2): The name by which we want to use the Service within JavaScript. This could be the exact same name as the Service or a name which you can choose. Must not include whitespaces.
Access the Service from within JavaScript
Now let’s finally use the service within JavaScript:
Reading from Aerospike
Signature: services.<Logical Service Name>.<Read<Collection> or Functionname>({Key: key})
Example: services.CustomerData.ReadCustomerData({Key: msisdn})
let aerospikeData = null;
try {
    // Service defined as synchronous. Therefore no promise:
    // Servcie access defined as synchronous. Therefore no promise syntax here
    areospikeData = services.CustomerData.ReadCustomerData(
        {Key: msisdn}
    );
    // services: fixed internal term to access linked services
    // CustomerData: The logical name of the service which we have given to it
    // ReadCustomerData: Collection function to read the customer data with the given Key
} catch (error) {
...
}

// Output the MSISDN data
processor.logInfo('MSISDN: ' + aerospikeData.data.Bin.MSISDN);
processor.logInfo('History: ' + aerospikeData.data.Bin.History.PaymentType);
Insert/Update to Aerospike
Signature: services.<Logical Service Name>.<Write<Collection> or Functionname>({Key: key, Bin: {bin1:value, bin2: value, ...}})
Example: services.CustomerData.WriteCustomerData({Key: msisdn, Bin: {MSISDN: msisdn, History: msisdnData.history}})
Properties:
Key: is the key of the record to be written.Bin: is an object which contains the Bins to be written.WritePolicy: This is where you can define some Aerospike specific write policies.Generation [number]: This is the generation of the record. If the record has been updated since the last read, then the write will fail. If not defined, then write will always succeed.Expiration [number]: This is the time in seconds after which the record will be deleted from Aerospike. If not defined, then the record will not expire.GenerationPolicy: This defines the generation policy. If not defined, then the generation policy isNONE. If set toEXPECT_GEN_EQUAL, then the write will only succeed if the generation of the record is equal to the generation defined in theGenerationproperty. If set toEXPECT_GEN_GT, then write will only succeed if the generation of the record is greater than the generation defined in theGenerationproperty.RecordExistsAction: This defines what to do if the record already exists. If not defined, then the record will not be written. If set toUPDATE, then the record will be updated. If set toUPDATE_ONLY, then the record will only be updated if it already exists. If set toREPLACE, then the record will be replaced. If set toREPLACE_ONLY, then the record will only be replaced if it already exists. If set toCREATE_ONLY, then the record will only be created if it does not exist.
try {
    services.CustomerData.WriteCustomerData(
        {
            Key: msisdn,
            Bin: {
                MSISDN: msisdn,
                History: msisdnData.history
            },
            WritePolicy: {
                Expiration: 3600
            }
        }
    )
} catch (error) {
...
}
Deleting from Aerospike
Signature: services.<Logical Service Name>.<Delete<Collection> or Functionname>({Key: key})
Example: services.CustomerData.DeleteCustomerData({Key: msisdn})
try {
    services.CustomerData.DeleteCustomerData(
        {Key: msisdn}
    )
} catch (error) {
...
}
Service Testing
layline.io provides a test facility for testing your Services before you deploy them. In this way, you save time and effort by testing your Services without having to deploy and activate a whole Project with Workflows.
Once you have configured your Service(s), you can test them:
Within your Asset Configuration tab (1), switch to the Test tab (2) to test your Service.

Test Facility Toolbar
The toolbar provides the following options:

The Testing tab provides two major views:
- Testcase configuration: This is where you define the testcases to be executed.
- Testcase execution: This is where you can execute the testcases and see the results.
You switch between these two views by clicking on the leftmost icon in the toolbar (1).
Let's start with the Testcase configuration view.
Testcase Configuration
The concept of the Testing is to define a set of Testcases which can be executed in a batch or individually. For this purpose, you can define multiple Testcases and configure them individually. I.e. each Testcase groups a number of indidivual tests which can be executed individually or in a batch.
Adding a Testcase
Click Add Testcase in the toolbar to add a new testcase:
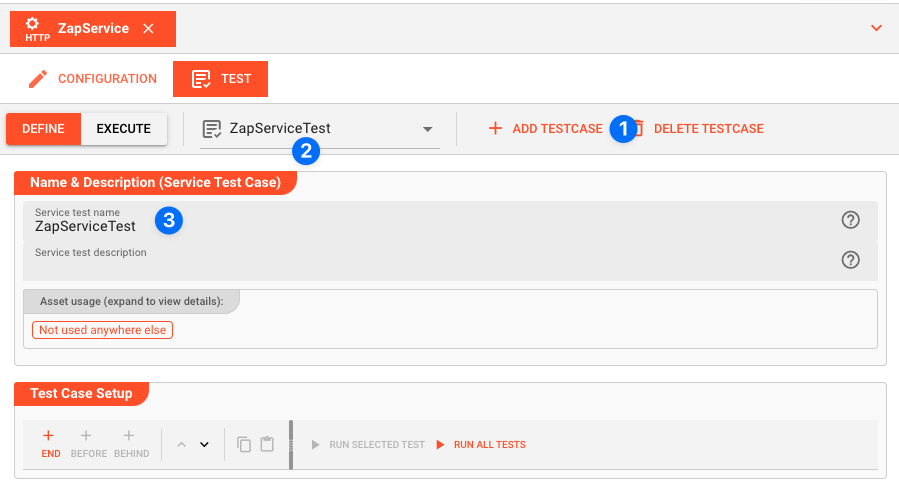
A new Testcase is added.
It is automatically named New<Service Asset Name>Test (3) and added to the list of Testcases (2).
Service test name(3): You can change the name of the Testcase here.Service test description(4): You can add a description to the Testcase here.
Test Case Setup
Basics
In this section you define the individual tests to be executed for this Testcase.
To start, click # END in the toolbar:
A new test is added to the list of tests (1), and the test is opened for configuration (2).
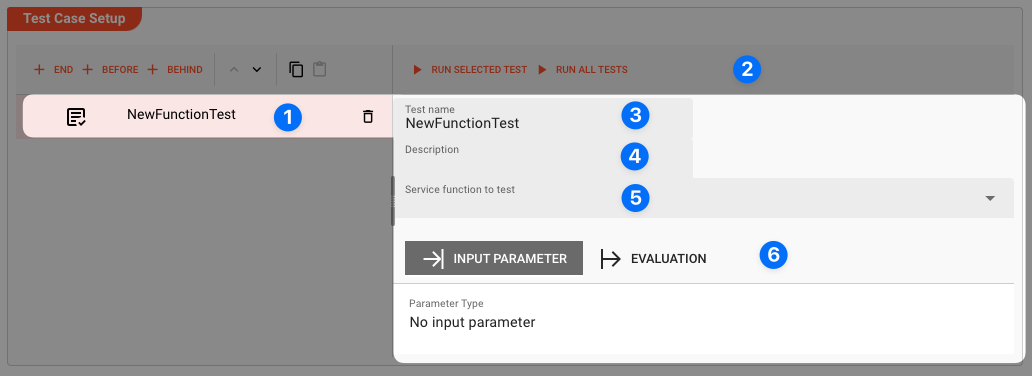
Next we fill in the details:
-
Test name(3): You can change the name of the Test here. -
Test description(4): You can add a description to the Test here. -
Service function to test(5): Select the Service function to test here.This list contains all Service functions which are defined in the Service Asset. Pick the one you want to test.
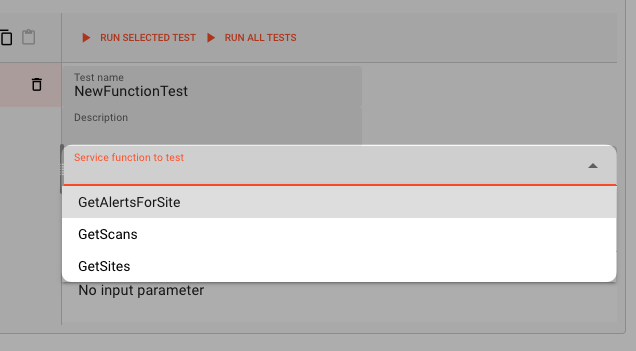
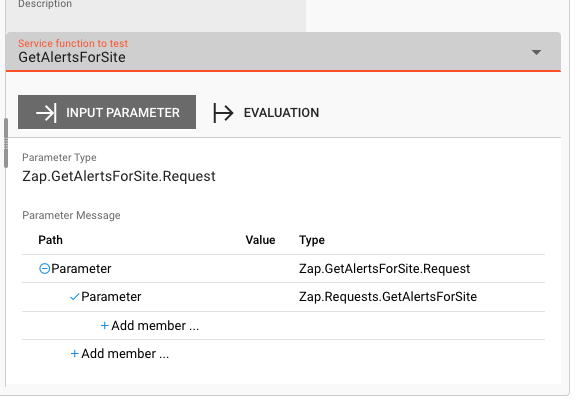
Once a Service function is selected, the system will automatically create a skeleton to fill in the respective parameters for the selected Service function.
Service Function Input Parameters
-
Service Function Input Parameters(6): Fill in the respective parameters for the selected Service function.In our example we have a function
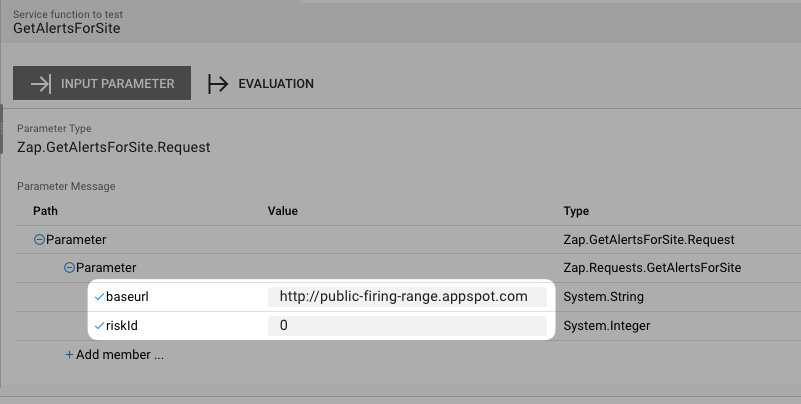
GetAlertsForSitewhich takes two parametersbaseurlandriskId. If we click onAdd memberin the skeleton table the system will allow you to select the respective parameter from the list of available parameters: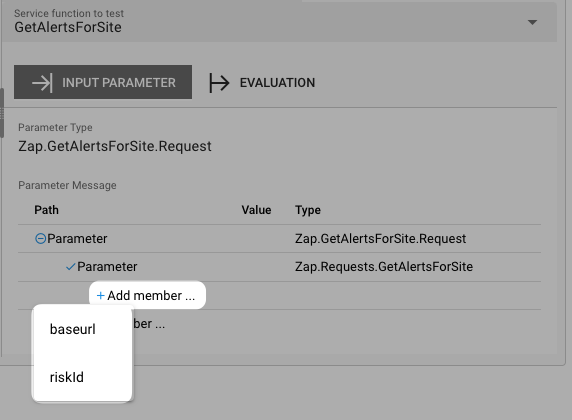
Once you have selected the parameter, the system will automatically add the respective parameter name. You then add the respective value for the parameter:
Service Function Evaluation Parameters
To automatically evaluate the result, you can add a script which analyzes the results.
Testcase Execution
Once you have configured your Testcases, you can execute them.
There are two ways on how to trigger execution:
-
Option 1: Select
Run selected testin the toolbar (1) to execute the currently selected Testcase.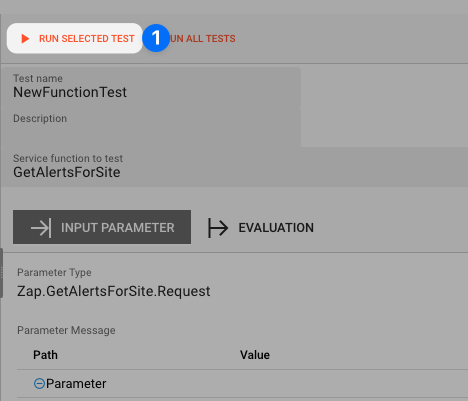
Executing a test this way will switch the tab to the Testcase execution view, execute the test and show the results.
-
Option 2: Switch to the Testcase execution view by clicking on the leftmost icon in the toolbar (1) select the test to execute, and then hit the
playbutton next to the test.
Each option will take us to the Testcase execution view:

In this view you can find the Testcase (1) and the Tests (2) we have created.
If we had created additional tests for this Testcase, they would be listed here as well.
Question marks indicate that the test has not yet been executed.
We can now either execute all tests, or run them individually:
-
Run all Tests(1): Click this button to execute all tests. -
Run Testcase(2): Click this button to a Testcase with all its underlying individual tests.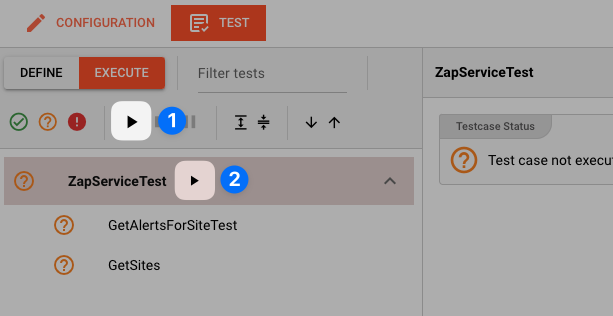
-
Run individual Test(3): Click this button next to a test to execute this individual test.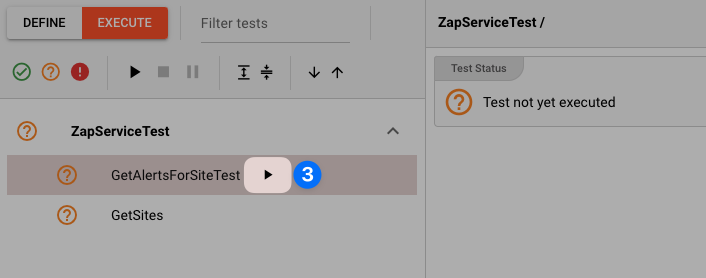
Once a test has been executed, the question mark will be replaced by a green check mark or a red cross depending on whether the test was successful or not.
The right hand-panel will show the results of the test execution respectively:
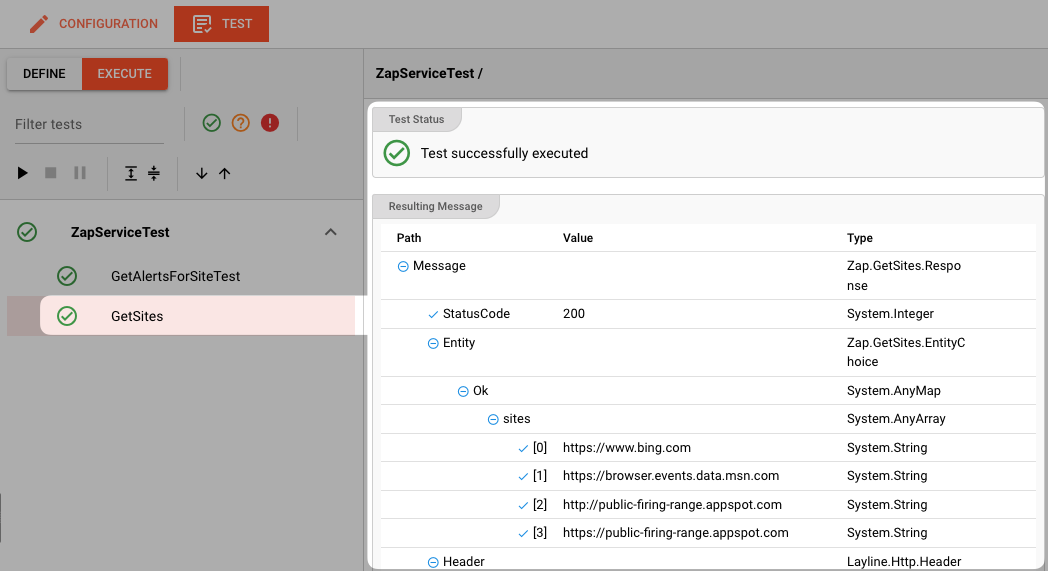
In case of errors, the system will show the error message for further investigation.
Please note, that the creation of the online documentation is Work-In-Progress. It is constantly being updated. should you have questions or suggestions, please don't hesitate to contact us at support@layline.io .