Alarm Center
The Alarm Center is the central place to monitor, manage, and configure alarms for your layline.io cluster. It lives under Operations → Cluster → Alarm Center and is organized into six tabs that cover the full alarm lifecycle — from active alerts to the configuration of where and how those alerts are delivered.
What are alarms?
Alarms are notifications raised by the cluster when something needs your attention. This can include:
- Engine or node errors
- Workflow failures
- Resource exhaustion
- Connection issues
- Any condition explicitly configured to raise an alarm
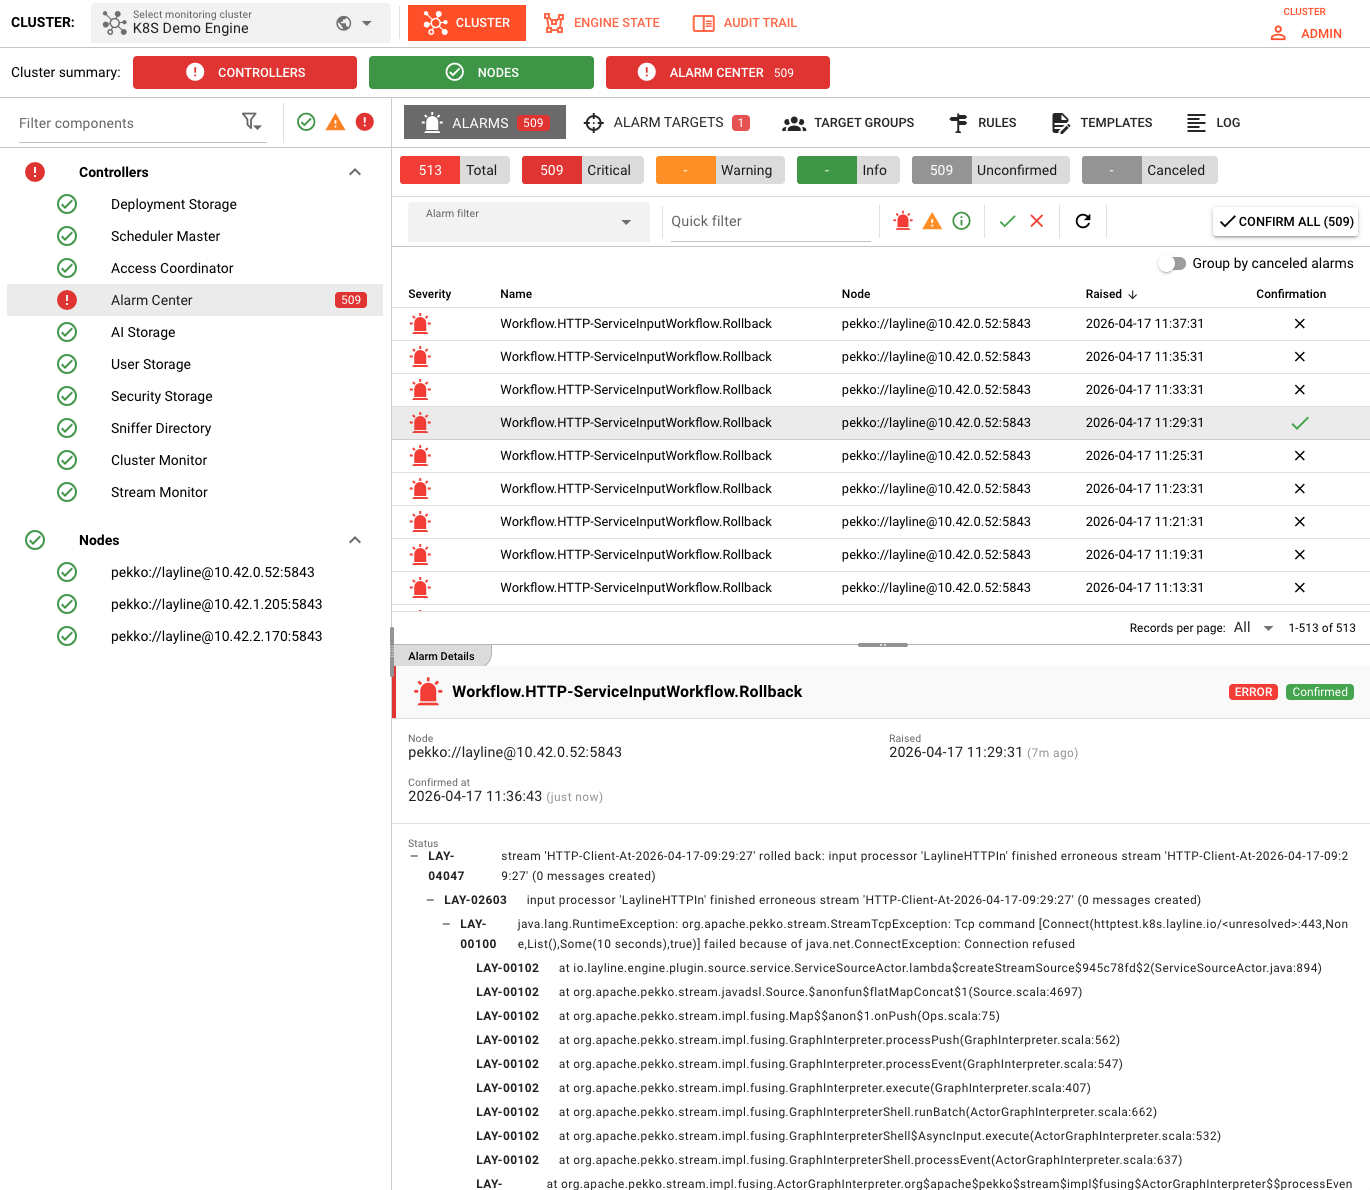
Each alarm has a severity (Error, Warning, or Info), a name that describes what happened, and a node that tells you where it originated. Alarms can be confirmed by an operator to signal "I have seen this," or they can be canceled automatically when the underlying condition resolves.
Alarm lifecycle
Understanding the lifecycle helps you use the Alarm Center effectively:
- Raised — The cluster detects a condition and creates an alarm.
- Unconfirmed — The alarm is visible and requires attention. Unconfirmed alarms are shown with a red close icon in the table.
- Confirmed — An operator acknowledges the alarm. Confirmed alarms remain in the list for reference but are marked with a green check.
- Canceled — The condition that caused the alarm is resolved. Canceled alarms are greyed out and can optionally be grouped under the alarm that canceled them.
Canceled alarms do not mean they were "deleted." They are still visible (especially when "Group by canceled alarms" is enabled) so you can trace the history of an issue.
Alarm configuration as project assets
In addition to runtime configuration through the Alarm Center UI, Alarm Rules, Email Targets, and Teams Targets can be defined as assets inside a layline.io project and deployed together with it. This lets you version-control your alarming setup alongside your workflows and ensures the same configuration is present on every cluster the project is deployed to.
The six tabs
The Alarm Center is divided into six tabs. Each tab has a dedicated documentation page:
| Tab | Purpose |
|---|---|
| Alarms | View, filter, confirm, and inspect active and historical alarms. |
| Alarm Targets | Configure notification endpoints such as Email (SMTP or MS 365) and Microsoft Teams. |
| Target Groups | Organize targets into named groups so rules can route to multiple recipients at once. |
| Rules | Define regex-based rules that match alarm names and route them to specific targets or target groups. |
| Templates | Create plain-text and HTML templates that control the content of alarm notifications. |
| Log | Inspect the runtime log of the Alarm Center component itself. |
Typical workflow
If you are setting up alarming for the first time, the recommended order is:
- Create Targets — Define at least one Email or Teams target under Alarm Targets.
- Create Target Groups (optional) — If you want to notify multiple people or systems, group targets under Target Groups.
- Create Rules — Under Rules, write regex patterns that match the alarms you care about and assign them to targets or groups.
- Create Templates (optional) — Customize the message format under Templates if the default content is not sufficient.
- Monitor Alarms — Switch to the Alarms tab to watch for raised alarms, confirm them, and inspect their details.
- Check the Log — If notifications are not arriving, use the Log tab to diagnose target or rule execution issues.
Navigation
To open the Alarm Center:
- Select Operations from the main navigation.
- Select the Cluster you want to manage.
- Click Alarm Center in the left sidebar or tab bar.
The Alarm Center will open with the Alarms tab active by default. Badge counters on the tab labels show:
- Alarms — Number of unconfirmed
Error(red) andWarning(orange) alarms. - Alarm Targets — Number of targets currently in an error state.